Friday, April 22, 2016
HOW TO MOUNT MS WORD DIGITAL DRAWING FOR DISPLAY
MICROSOFT WORD DRAWING PROJECT No. 32
TITLE: HOW TO MOUNT MS WORD DIGITAL DRAWING FOR DISPLAY
TYPE: FINE ART
Over the years I have created many drawings, paintings and prints and mounted some of them on the wall of my house. I have never sold any of my works and normally use them for my books illustrations. After I wrote a book on this subject 10 years ago, I started to mount and display MS Word Drawings like any other fine art works. Even though the works are much smaller in size (A4), well, why not?
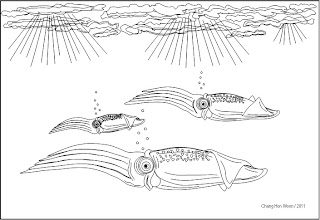
Do readers still remember the fine art digital drawing depicting squids swimming in the sea in MS Word Drawing Project No. 20? It would be a waste to let it sit in the virtual space. Why not print it out and mount it on your living room or dining room wall so that it can be viewed by other people. By doing so, you’re bringing the digital visual art work out into the real-world. Many years ago, I read a computer art book published by Hayden Books in 1998 which inspired me to pursue computer graphics as works of art. The title of the book is Fine Art Photoshop Lessons in Digital Drawing and Painting by Michael J. Nolan and Renèe LeWinter. This book contains lessons in digital drawing and painting with Photoshop where it combines the traditional methods of art with digital technology to produce works of art. I believe that digital art or computer art is slowly breaking onto the contemporary art scene especially in this 21st century. This reminds me of the arrival of pop art on the art scene in the 1960’s which made an impact and then became a part of the modern art scene.
In this project, I’ll show readers how to mount a picture created in MS Word to be displayed as a work of art. The three important things needed to mount a picture are as follows - picture frame, mounting board and the creative piece of work. Anyway, the illustration can be printed on A4 size paper (21 cm x 29.7 cm). Choose a frame that is slightly bigger than the picture. It’s better to get a frame with a matte-surface glass. Choose the glass with matte surface because a glossy surface will reflect light. Cut out a window from a piece of mounting board so that the picture fits nicely within the space of the window. I prefer to use stick glue or Scotch tape to stick the picture on the reverse side of the mounting board to hold it in place. About two or four pieces of tape will do the job. I love to use Scotch tape to repair torn documents and books because it won’t turn yellowish over a long period of time.
After having the work framed, the final task is to label the work. A label is important because it gives some information about the work. I always tell my students to give a suitable title for every work of art they have done and avoid naming their work “Untitled”. Generally, a work of art is labelled with the following details:
1. Name
2. Title
3. Year
4. Medium
5. Size
6. Location / Place (optional).
In other words, a work of art such as a drawing or a painting is labelled like this: Chang Hon Woon, Squids Swimming in the Sea, 2011, MS Word digital drawing, 19.5 x 28 cm, Malaysia. Visual Art Education teachers can use this MS Word drawing project to teach Drawing and Art Composition in class. Introducing the element of variety in teaching approach helps maintain a high level of interest in the learning of visual art.
The picture frame with matte-surface glass.

The mounting board with a window and a border drawn around it.

The picture of squids swimming in the sea.

If all go well, the mounted picture should look like this. I hung this picture in the kitchen. It just happens that one of my favourite dishes is squid.