Showing posts with label word. Show all posts
Showing posts with label word. Show all posts
Friday, April 29, 2016
HOW TO TEACH LINEAR PERSPECTIVE WITH MS WORD
MICROSOFT WORD DRAWING PROJECT No. 13
TITLE : HOW TO TEACH LINEAR PERSPECTIVE WITH MS WORD
TYPE : ILLUSTRATION
VISUAL ART LESSON TOPIC : ELEMENT OF ART : SPACE

© Chang Hon Woon 2011
Space is one of the Elements of Art. The System of Perspective is one of the subtopics in the Space element which consists of Linear Perspective and Aerial Perspective. The point where the perspective lines meet is called the Vanishing Point. A drawing can be made from one vanishing point, two vanishing points, and three vanishing points. There are a few rules in Linear Perspective but I’ll mention two which I consider the most important. I will use the simplest words to explain them. These rules are as follows:
- Receding parallel lines seem to converge and meet at a point known as the vanishing point on the horizon line, e.g. the railway tracks.
- Distance influences the size and height of objects. The objects in front are much bigger and longer than the objects further behind, e.g. the lamp posts along the road side.
What makes the system of perspective so important in visual art is that it helps to create the illusion of three-dimensional depth or space on a two-dimensional surface such as the drawing paper or the electronic canvas in Photoshop. By the way, you can also copy this drawing into PowerPoint to create a slide show presentation.


HOW TO DRAW A SNOWMAN IN MS WORD
MICROSOFT WORD DRAWING PROJECT No. 46
TITLE: HOW TO DRAW A SNOWMAN IN MS WORD
TYPE: CLIP ART
Clip art images are small size pictures that can be easily added to the document. They can either be JPEG, Vector or other formats. The purpose of adding clip art images into the document is to illustrate or enhance its appearance. There are many ways to obtain clip art images but have you ever tried creating clip art images on your own with the word processor? Images created in MS Word are vector graphics and they are saved as DOC files. Many of the drawing projects featured on my blog can actually be used as clip art images. Here is a simple drawing project and I hope readers can try it out, that is drawing a snowman in MS Word. First, draw a picture of the snowman on a piece of paper. This practice enables you to know the details of the subject well. Later on, you can proceed to draw it on the computer using your creativity.
Use only the Curve line tool to draw the picture of the snowman. I love to use the Curve line tool to draw organic shape objects because the results will be quite natural. Start by drawing three round shapes of different sizes. Then, create the details for the head. After that, complete the details for the body. Finally, fill the shapes with colours of your choice.

This digital drawing of a snowman was drawn with MS word 2003 Drawing program.
THE DISSECTED DRAWING:

A total of 36 drawing objects were created to form the picture of the snowman.
HOW TO DRAW A HOUSE IN MS WORD
MICROSOFT WORD DRAWING PROJECT No. 12 (PART 1)
TITLE : HOW TO DRAW A ONE POINT PERSPECTIVE MODEL HOUSE IN MS WORD
TYPE : ILLUSTRATION

© Chang Hon Woon
Here is the model of a modest brick house complete with a chimney that was drawn entirely by Freeform line tool. First, start with the side portion. Secondly, draw the front portion of the house. Next, draw the roof, and so on. Some knowledge about linear perspective is needed to create this drawing so that the drawing will not be out of proportion. I will show you later how to use this drawing project to teach an art lesson about one point perspective. I actually tried the idea of teaching students the basics of computer graphics with MS Word in my school many years ago. My main intention was to expose them to the concept of computer graphics. I took my students to the school computer lab a few times and taught them how to draw pictures with the MS Word Drawing toolbar (Microsoft Office 95 and 97) and they enjoyed the lessons. The picture that I taught them to draw was an adult ant (with wings) which could be drawn using only the Oval and Moon shapes and Line tool for the feelers. Let me leave this project like that for the time being (without the dissected drawing parts) for readers to practise drawing the model house on their own as homework. I will show how the drawing is done in my next post. As the saying goes, practice makes perfect. See you then!
Sunday, April 24, 2016
HOW TO DRAW A FLYING WILD GOOSE IN MS WORD PART 2
MICROSOFT WORD DRAWING PROJECT No. 22 PART 2
TITLE: HOW TO DRAW A FLYING WILD GOOSE IN MS WORD
TYPE: FINE ART – DIGITAL LINE DRAWING
(A) THE DIGITAL DRAWING OF THE FLYING WILD GOOSE
As you can see, I created and manipulated the lines and shapes and then stacked them together to form the picture. In the next post, I’ll dissect the drawing to reveal how the drawing is done. In the meantime, try drawing this on your own.

HOW TO DRAW A LIGHTED CANDLE IN MS WORD PART 3
MICROSOFT WORD DRAWING PROJECT No. 23 PART 3
TITLE: HOW TO DRAW A LIGHTED CANDLE IN MS WORD
TYPE: GRAPHIC DESIGN
(B) HOW TO CREATE THE EFFECTS FOR THE ILLUSTRATION?
Users of Microsoft Word 2010 and 2007 can create effects for graphics with the tools on the Format tab. Click at a drawing object to reveal the Format tab on the Standard Toolbar. Click the arrow next to Shape Fill and you will find most of the tools needed to create effects for your graphics. The Gradient option with a variety of variations is mostly used to create 3-D effects to drawing objects. By the way, if MS Word has the Feathering option like Photoshop, the candle light effect will be more realistic. I will use a table to explain how these effects are created.

Effect No. | Tools | How to do it? |
1 | Shape Fill More Fill Colors | Fill object with Yellow colour Move Transparency slider to 40% on Standard tab |
2 | Shape Fill > Theme Colors Gradient > More Gradients > Colors > Shading Styles | Two Colors > Orange, Accent 6, Darker 25% & Yellow Horizontal > Choose Variant No. 1 (Top Left) > OK |
3 | Shape Fill Gradient > Colors > Shading Styles | Fill object with Blue colour Vertical > Choose Variant No. 4 (Bottom Right) > OK |
4 | Shape Fill > Texture | Sand |
5 | Shape Fill Gradient > Colors > Shading Styles | Two Colors > Purple & Purple, Accent 4, Lighter 60% Vertical > Choose Variant No. 4 (Bottom Right) > OK |
6 | Shape Fill Gradient > Colors > Shading Styles | Fill object with Aqua colour Horizontal > Choose Variant No. 2 (Top Right) > OK |
7 | Oval > Shape Fill | Fill object with Black, Text 1, Lighter 35% |
Saturday, April 23, 2016
HOW TO DRAW A PANDA HEAD IN MS WORD
MICROSOFT WORD DRAWING PROJECT No. 14 (PART 1)
TYPE : GRAPHIC DESIGN

Ever come across situations at times that don’t really go your way. This happened to me when I tried to draw a happy looking panda but it ended up with the panda looking quite angry. After trying a few times and still couldn’t get it right, I realized that it’s not really that bad. After all, you can’t expect a panda to be happy all the time, right? So, why not for a change use this image for a t-shirt design? I wish to apologise for posting the drawing of a not so happy looking panda. This drawing was created using only the Curve line tool. The Edit Points tool was used to fine-tune the lines. Readers are encouraged to draw this picture on their own. I’ll show how the drawing is created in my next post. Got to go!
Friday, April 22, 2016
HOW TO MOUNT MS WORD DIGITAL DRAWING FOR DISPLAY
MICROSOFT WORD DRAWING PROJECT No. 32
TITLE: HOW TO MOUNT MS WORD DIGITAL DRAWING FOR DISPLAY
TYPE: FINE ART
Over the years I have created many drawings, paintings and prints and mounted some of them on the wall of my house. I have never sold any of my works and normally use them for my books illustrations. After I wrote a book on this subject 10 years ago, I started to mount and display MS Word Drawings like any other fine art works. Even though the works are much smaller in size (A4), well, why not?
Do readers still remember the fine art digital drawing depicting squids swimming in the sea in MS Word Drawing Project No. 20? It would be a waste to let it sit in the virtual space. Why not print it out and mount it on your living room or dining room wall so that it can be viewed by other people. By doing so, you’re bringing the digital visual art work out into the real-world. Many years ago, I read a computer art book published by Hayden Books in 1998 which inspired me to pursue computer graphics as works of art. The title of the book is Fine Art Photoshop Lessons in Digital Drawing and Painting by Michael J. Nolan and Renèe LeWinter. This book contains lessons in digital drawing and painting with Photoshop where it combines the traditional methods of art with digital technology to produce works of art. I believe that digital art or computer art is slowly breaking onto the contemporary art scene especially in this 21st century. This reminds me of the arrival of pop art on the art scene in the 1960’s which made an impact and then became a part of the modern art scene.
In this project, I’ll show readers how to mount a picture created in MS Word to be displayed as a work of art. The three important things needed to mount a picture are as follows - picture frame, mounting board and the creative piece of work. Anyway, the illustration can be printed on A4 size paper (21 cm x 29.7 cm). Choose a frame that is slightly bigger than the picture. It’s better to get a frame with a matte-surface glass. Choose the glass with matte surface because a glossy surface will reflect light. Cut out a window from a piece of mounting board so that the picture fits nicely within the space of the window. I prefer to use stick glue or Scotch tape to stick the picture on the reverse side of the mounting board to hold it in place. About two or four pieces of tape will do the job. I love to use Scotch tape to repair torn documents and books because it won’t turn yellowish over a long period of time.
After having the work framed, the final task is to label the work. A label is important because it gives some information about the work. I always tell my students to give a suitable title for every work of art they have done and avoid naming their work “Untitled”. Generally, a work of art is labelled with the following details:
1. Name
2. Title
3. Year
4. Medium
5. Size
6. Location / Place (optional).
In other words, a work of art such as a drawing or a painting is labelled like this: Chang Hon Woon, Squids Swimming in the Sea, 2011, MS Word digital drawing, 19.5 x 28 cm, Malaysia. Visual Art Education teachers can use this MS Word drawing project to teach Drawing and Art Composition in class. Introducing the element of variety in teaching approach helps maintain a high level of interest in the learning of visual art.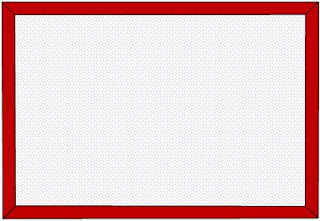
The picture frame with matte-surface glass.

The mounting board with a window and a border drawn around it.
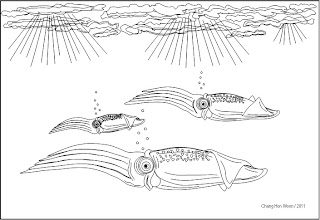
The picture of squids swimming in the sea.
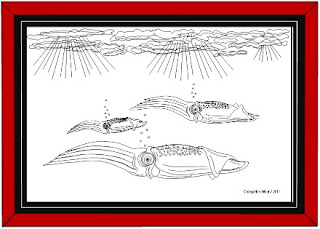
If all go well, the mounted picture should look like this. I hung this picture in the kitchen. It just happens that one of my favourite dishes is squid.
HOW TO CREATE A COLOURED GARDEN SNAIL IN MS WORD
MICROSOFT WORD DRAWING PROJECT No. 25 PART 1
TITLE: HOW TO CREATE A COLOURED GARDEN SNAIL IN MS WORD
TYPE: GRAPHIC ART
In this project, I’ll show readers how to create a graphic design with the digital drawing of a garden snail which is at the first place a fine art drawing. Works of art such as drawings, paintings, prints and sculptures that are created for display and to be admired for their esthetical values as well as mediums for artists to express their creativity, emotions and thoughts are known as fine arts. These works are not intended to be produced in large quantities for practical or commercial use. However, graphic art is more inclined to commercial purposes. Therefore graphic designs which are meant for a larger audience are produced in large quantities such as posters, advertisements, magazine covers, brochures, labels, and so on. Graphic artists got to produce works in accordance to the needs and expectations of the clients. As a matter of fact, I personally feel that until now naturalistic works are still the preferred choice of most clients.
Adding colour effects to the drawing enhance its appearance. To create a coloured drawing of the snail, use the tools on the Format tab to create the desired effects. For example, to create 3-D effects for the shell, do the following:
Format > Shape Fill > Gradient > More Gradients, and in the Fill Effects dialog box, choose a colour or two colours and also a shading style (From Center). You can also try choosing an effect from Shape Styles.
Feel free to experiment with the tools to get the desired effects. Don’t worry, they won’t bite!

Free PDF to Word Converter !!

Hello Guys! Its been a long time since I wrote about any software. Today Ive come with a great tool for you. With this tool, you can easily convert your PDF Document into editable Word Document! And certainly you get this for free!
Look at the screenshot below:

Instruction:
After installing the software you will get desktop icon. Double click on it to run the software. Then you will get the screen like the image above. Then complete your task as below:
- Choose the source file (PDF) from the left box.
- Select the destination folder from the right box.
- Limit the number of pages from General Options. It could be All Pages or specific range of pages (suppose 1 to 10).
- Unmark the options (Retains Shapes and Uses Text Box) to avoid unnecessary boxes in the converted document.
- You can choose either Times New Roman or Arial as the conversion font. Later you can change it while editing.
- As Doc Reader, you can choose either Word Pad or MS Word as your necessity.
- When youre ready to go, simply hit on the Convert button and wait for a few moments.
Advantages:
- Absolutely Free - No Serial Key Needed !!!
- Small in Size - Less than 2 MB
- Fast, Safe and Simple User Interface - No boring options, No Ads
Download Free PDF to Word Converter
You may also like:
- How to Create PDF file?
- Convert a Webpage into PDF
Stay with Marks PC Solution to get more interesting IT topics!
Monday, April 18, 2016
HOW TO DRAW TWO DIMENSIONAL TEST TUBE IN MS WORD


As you can see in the dissected diagram above, the Rectangle and Rounded Rectangle in dashed lines were used to mask the top portion of the two rounded rectangles below to create the test tube and its content (water). To create the water image in the test tube, fill the second Rounded Rectangle with Dashed Horizontal Pattern Fill Effect. After that, hide the shapes line. The test tube brim was created by joining two arcs which were rotated at a certain degree. Later on in my next project, I’ll show you how to draw the 2-D retort stand.
Thursday, April 14, 2016
HOW TO DRAW A PANDA IMAGE FLASH DRIVE DESIGN IN MS WORD
MICROSOFT WORD DRAWING PROJECT No. 17
TITLE: A PANDA IMAGE FLASH DRIVE DESIGN
TYPE: GRAPHIC DESIGN

Having drawn the panda and the flash drive in MS Word in the earlier graphics projects, why not combine these two subjects to create a panda image flash drive design. In case readers wonder why use a serious looking panda image for the design, I feel that the flash drive with this design is suitable to be used to keep “serious data” such as document, PowerPoint and other project files. I prefer to use the rabbit design instead to keep “light data” such as movie, mp3 and picture files. Well, this is only my opinion.
Wednesday, April 13, 2016
HOW TO CREATE AN ENVIRONMENTAL THEME T SHIRT DESIGN IN MS WORD
MICROSOFT WORD DRAWING PROJECT No. 31
TITLE: HOW CREATE AN ENVIRONMENTAL THEME T-SHIRT DESIGN IN MS WORD
TYPE: GRAPHIC DESIGNI still remember the time when a can opener was one of the most important utensils in the kitchen. Before the 1980’s, most canned food could only be opened with the can opener. Even a child nowadays can open a can easily just by lifting the tab attached to the lid and pull backwards to remove it. I happened to open a can of peanuts one day and after observing the lid for quite some time, I was struck by the idea of using this lid as the subject for a graphic design. In this project, I used a throwaway object as the subject for a t-shirt design where the concept of the design is “Recycle for the Conservation of Our Natural Environment”. Actually, readers can get plenty of ideas for visual art projects by observing nature and man-made objects around us.
Readers can refer to MS Word Drawing Project No. 15 for tips on how to draw a plain t-shirt. After creating the design, paste it on the t-shirt. Below is the graphic design created with Microsoft Word 2007 drawing program. I used only four tools to draw it. These tools are: Oval, Block Arc, Curve line, and Moon. I also used WordArt to insert the curved shape text into the drawing. Make use of the shadow effects to create emboss or bevel effects to enhance the illustration’s appearance.

This is a simple graphic design with the underlying message that recycling helps to curb pollution and gives us a brighter future and I’m sure that we all want that.

This is how the finished drawing looks like when the design is placed on the t-shirt.
HOW TO DRAW A FLASH DRIVE IN MS WORD
MICROSOFT WORD DRAWING PROJECT No. 11
TYPE : GRAPHIC DESIGN

© Chang Hon Woon
The good thing about computer graphics is that an image created digitally can be reused countless of times in many ways without having to redraw it again. In this project, I’m going to use the image of the rabbit face created in Project No. 9 to create a flash drive design that is a bit different from those that you normally see.
1/2
HOW TO DO IT:

Rounded Rectangle, Rectangle, Line, and Text Box were used to create this design. In the next project, I will show you how to draw a house using only the Freeform line tool. Well you see, this simple graphics program can do many things, only if you know how.
2/2
Tuesday, April 12, 2016
How to Print Word Document as Booklet

You can print your Word Document as book. In MS Word, the term is known as Book Fold which can be found in the Page Setup dialogue box. If you want a document to be printed as a booklet, you must set up the document at first. Otherwise your document settings may change too much. And this will take a huge time to fix the settings.
For last few days, Ive published several posts on Excel. Now its time to write something on MS Word. What do you think? :)
Applies to All Versions of MS Word
- Word XP, 2003
- Word 2007, 2010, 2013
What does Book Fold Do?
Its a good question to begin the discussion. Suppose you have a document with 4 pages. If you want the printed document to be looked like a book, you can use the booklet option. The Word will print your document as show in the image below:

And if you print the two pages in both sides of a single paper, it will be like a book! What if you have 8 pages? Then it will be printed as below:

That means the last page of the document will be printed with the first one. Then the second page and the second last page will be printed together. Thus the series will continue. Even page will be printed on the left side and the odd page will be printed on the right.
In a 8-page document, you have to use 2 papers only. Page 8, 1 and 2, 7 should be printed on the both sides of a single paper. Then page 6, 3 and 4, 5 will be printed on another paper. The second paper should be folded in the first paper if you want the document as book.
The concept of booklet is little bit tough if you have no practical experience. So, I suggest you to try it directly if you have a printer. :)
How to Use Book Fold?
If you use Book Fold after completing your document, you may suffer a lot. Because it will change your text or graphics position. So, if you have any intention to print the document as book, your should set your document as Book Fold when you set up the page.
Follow the steps below:
If you have any confusion, please leave a comment . . . :)
How to Use Book Fold?
If you use Book Fold after completing your document, you may suffer a lot. Because it will change your text or graphics position. So, if you have any intention to print the document as book, your should set your document as Book Fold when you set up the page.
Follow the steps below:
- Open a document or create a new one
- Go to the Page Setup option from Page Layout Tab (In Office XP, 2003: File > Page Layout)
- Margins > Pages > Multiple Pages > Choose Book Fold
- Sheets per Booklet > Choose All
- Hit OK to exit. Done!
How to Print Booklet?
You must know the right way to print a booklet properly. If your printer supports automatic both side printing, the task will be much easier for you. But if it doesnt, then you have to print both sides manually.
Go to the Print options > Print on Both Sides (Flip on Short Edge)/ Manually Print Both Sides > Landscape Orientation > Hit OK.
If you have any confusion, please leave a comment . . . :)
Stay with Marks PC Solution to get more interesting IT topics!
Subscribe to:
Posts (Atom)
