Showing posts with label digital. Show all posts
Showing posts with label digital. Show all posts
Friday, April 22, 2016
HOW TO MOUNT MS WORD DIGITAL DRAWING FOR DISPLAY
MICROSOFT WORD DRAWING PROJECT No. 32
TITLE: HOW TO MOUNT MS WORD DIGITAL DRAWING FOR DISPLAY
TYPE: FINE ART
Over the years I have created many drawings, paintings and prints and mounted some of them on the wall of my house. I have never sold any of my works and normally use them for my books illustrations. After I wrote a book on this subject 10 years ago, I started to mount and display MS Word Drawings like any other fine art works. Even though the works are much smaller in size (A4), well, why not?
Do readers still remember the fine art digital drawing depicting squids swimming in the sea in MS Word Drawing Project No. 20? It would be a waste to let it sit in the virtual space. Why not print it out and mount it on your living room or dining room wall so that it can be viewed by other people. By doing so, you’re bringing the digital visual art work out into the real-world. Many years ago, I read a computer art book published by Hayden Books in 1998 which inspired me to pursue computer graphics as works of art. The title of the book is Fine Art Photoshop Lessons in Digital Drawing and Painting by Michael J. Nolan and Renèe LeWinter. This book contains lessons in digital drawing and painting with Photoshop where it combines the traditional methods of art with digital technology to produce works of art. I believe that digital art or computer art is slowly breaking onto the contemporary art scene especially in this 21st century. This reminds me of the arrival of pop art on the art scene in the 1960’s which made an impact and then became a part of the modern art scene.
In this project, I’ll show readers how to mount a picture created in MS Word to be displayed as a work of art. The three important things needed to mount a picture are as follows - picture frame, mounting board and the creative piece of work. Anyway, the illustration can be printed on A4 size paper (21 cm x 29.7 cm). Choose a frame that is slightly bigger than the picture. It’s better to get a frame with a matte-surface glass. Choose the glass with matte surface because a glossy surface will reflect light. Cut out a window from a piece of mounting board so that the picture fits nicely within the space of the window. I prefer to use stick glue or Scotch tape to stick the picture on the reverse side of the mounting board to hold it in place. About two or four pieces of tape will do the job. I love to use Scotch tape to repair torn documents and books because it won’t turn yellowish over a long period of time.
After having the work framed, the final task is to label the work. A label is important because it gives some information about the work. I always tell my students to give a suitable title for every work of art they have done and avoid naming their work “Untitled”. Generally, a work of art is labelled with the following details:
1. Name
2. Title
3. Year
4. Medium
5. Size
6. Location / Place (optional).
In other words, a work of art such as a drawing or a painting is labelled like this: Chang Hon Woon, Squids Swimming in the Sea, 2011, MS Word digital drawing, 19.5 x 28 cm, Malaysia. Visual Art Education teachers can use this MS Word drawing project to teach Drawing and Art Composition in class. Introducing the element of variety in teaching approach helps maintain a high level of interest in the learning of visual art.
The picture frame with matte-surface glass.

The mounting board with a window and a border drawn around it.
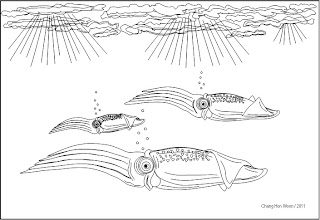
The picture of squids swimming in the sea.

If all go well, the mounted picture should look like this. I hung this picture in the kitchen. It just happens that one of my favourite dishes is squid.


Sunday, April 10, 2016
HOW TO MOUNT MS WORD DIGITAL DRAWING FOR DISPLAY PART 2
MICROSOFT WORD DRAWING PROJECT No. 34
TITLE: HOW TO MOUNT MS WORD DIGITAL DRAWING FOR DISPLAY PART 2
TYPE: FINE ART
Still remember Project No. 30 that shows how the drawing of a half apple can be done in MS Word? Now you have learned how to draw a tangerine, right? Why not use these two drawings to create a still life composition that can be mounted on the wall. Please refer Project No. 32 for information on how to mount a piece of artwork for display. Art teachers can make use of this activity to teach composition and balance. In a visual art composition, elements, subjects or images are arranged in a given space such as the space on a piece of drawing paper resulting in a visually balanced work. The principles of design are used to help achieve unity in the overall composition and thus creating a quality work of art. Knowledge in Basic Design or Visual Art Theory has its advantages because it enables the artist to explain in elaborate details about his or her work of art. That is why the topic of Art Appreciation is also taught in Art Class.

Chang Hon Woon, Half Apple and Tangerine on Marble Table, 2012, MS Word digital drawing and photography, 19.5 x 28 cm, Malaysia.
All these drawings were created by the Curve line tool. Finally, add in the shadow effects and you’ll have a piece of work like the one above. Here’s another piece of work that is suitable to be mounted on the dining room wall.
Sunday, January 3, 2016
HOW TO CREATE A DIGITAL BIRTHDAY CARD IN MS WORD
MICROSOFT WORD DRAWING PROJECT No. 38
TITLE: HOW TO CREATE A DIGITAL BIRTHDAY CARD IN MS WORD
TYPE: GRAPHIC DESIGN
This project is especially for the parents. My two daughters who are now in secondary school used to work together to make a birthday card each for my wife and I on our birthday ever since they were in Primary School. On Father’s Day and Mother’s Day, they will collaborate to make a gift for us. We are delighted with the efforts they put in to create the cards and gifts even though they can always buy them at the stationery shops or gifts shops. We treasure their handmade cards and gifts and keep them with pride. In today’s fast-paced world where people are always busy occupied with work, adding personal touch by creating and making things for people that we love, really makes the difference.
For their birthday, I usually choose the easy way - spending money. I’ll buy them a cake and give them a dinner treat, etc. However, I feel that if we as parents would spend a little time to actually create a birthday card for our kids, that’ll be the show of love that our kids will cherish which money couldn’t buy. Many a time, many parents always say that they’re too busy until they seldom spend much time with their family. If given a choice, most parents would like to spend minimal time at work and devote more time to their family, but this is not possible in this modern society. But everybody has 24 hours, right? It is really up to us to make time for our family. In this aspect, I’d figured out a way for parents to create a digital birthday card with MS Word and send the Word document to their son or daughter on his or her birthday via email. Still using the apple as the subject matter, I’ll show readers how to create a birthday card with the theme “YOU ARE THE APPLE OF MY EYE”. This birthday card design is just one example. Giving someone a printed card bought from the store is OK but giving someone a card specially made by ourselves is so much better.

This is how the digital birthday card would look like when your child opens the Word document that you emailed.
I believe that this design will surprise your child.
HOW TO CREATE THE BIRTHDAY CARD?
Use the Curve line tool to create the image of an apple viewed at eye-level. Create an organic shape and insert a picture of your child in it. Then, create the text with WordArt. Insert the decorative text into the Text Box to enable it to be moved around. Go to Shape Outline and click No Outline to remove the outline.

The apple is the main subject of the design.

The drawing is dissected to show the drawing objects.

The drawing objects filled with colours, gradients effects and picture.
HOW TO INSERT A PICTURE INTO A SHAPE?
Copy the apple shape and resize it by dragging on the handles. To insert a picture into the shape, do the following: Format > Shape Fill > Picture > (Select picture from a source) > Insert. Don’t forget to group all these separate units into a single unit.


The card with decorative text inserted into a Rectangle shape and later on with the outline removed. Insert the image on the right side of the card. Add in the Shadow effects. When the design is completed, group all these drawing objects into a single unit. The final step I think you know what to do?
Subscribe to:
Posts (Atom)
