Showing posts with label booting. Show all posts
Showing posts with label booting. Show all posts
Friday, April 22, 2016
Dual booting Ubuntu and Linux Mint
Most Linux enthusiasts know how to install both Linux and Windows on the same PC, and then boot either; this is known as dual booting (or multibooting). However, dual booting two Linux distributions is not as easy as dual booting one Linux distribution with Windows.
Ubuntu and Linux Mint are both popular Linux distributions. If you wish to compare them on the same PC (such as an older, spare PC), this document can help you dual boot them.
Creating a boot-repair live CD - Before you can dual boot Ubuntu and Linux Mint, you need to create a boot-repair live CD as follows:
- Download the newest boot-repair-disk.isodisc-image file.
- Burn (write) the ISO file to a blank, writable CD.
- Label your CD as "Boot Repair Disc."
Installing Ubuntu and Linux Mint - To install both Ubuntu and Linux Mint on the same PC, do the following:
- Download a 32-bit Ubuntu live-disc ISO file, burn it to a DVD, and then use that DVD to install Ubuntu as the only operating system.
- Install all Ubuntu updates, and then reboot your PC.
- Download a 32-bit Linux Mint live-disc ISO file, burn it to a DVD, and then use that DVD to install Linux Mint, as a second operating system, alongside Ubuntu.
- Install all Linux Mint updates, and then reboot your PC.
Note: Until after you have run your boot-repair CD according to the section below, you can boot only Linux Mint.
Running your boot-repair CD - Your boot-repair CD lets you repair your boot process, which includes the GRand Universal Bootloader (GRUB). To run your boot-repair CD, do the following:
- Install both Ubuntu and Linux Mint on the same PC according to the section above.
- Place your boot-repair CD into the optical drive, reboot your PC. and then follow the boot-repair prompts.
- As explained in the section above, boot your boot-repair disc as a live disc, and then follow its prompts.
- When you see the Boot Repair window, click Recommended repair (repairs most frequent problems). Be patient, each boot-repair phase usually requires more than the "several minutes" that it promises.


Thursday, April 21, 2016
Creating and booting a UNetboootin live USB drive
You can use a bootable, live CD to evaluate and/or install any distribution of a Linux operating system. Alternatively, you can use a bootable, live USB drive for testing and installing Linux. This document explains how to create a live USB drive through the UNetbootin utility running under either Windows 7 or Linux, and then boot that live USB drive on almost any PC. While creating your live USB drive, you can either select a Linux distribution through UNetbootin or use an ISO file that you have previously downloaded.
Note:You can use either a live CD or a live USB drive to scan for viruses in a PC that runs Windows 7, or earlier. Please see Using Linux to rescue Windows.
Creating a live USB drive through Windows - If you are running Windows on your PC, you can create a live USB drive for evaluating any Linux distribution. For example, if you are running Windows 7 on your PC, you can do the following:
- Connect a USB drive to a USB port on your PC. It should display UDISK in an AutoPlay window.

- Go to unetbootin.scourceforge.net, and then click Download (for Windows).

- Open your Downloads folder, double-click unetbootin-windows-578.exe, and then click Yes (in the User Account Control window) to display the UNetbootin window.

- Select Distribution, select a Linux distribution, such as Puppy Linux, and then click OK to download and install UNetbootin and create a live USB drive. Be patient, this takes time.


- After the installation completes, remove your live USB drive, and then click Reboot Now.

- Connect a USB drive to a USB port on your PC.
- Go to unetbootin.scourceforge.net, and then click Download (for Linux).
- Open your Downloads folder, right-click unetbootin-linux-578, click Properties, click Permissions, click the Allow executing file as a program checkbox, and then close the Properties window.

- Double-click unetbootin-linux-578, type your password, and then click OKto display the UNetbootin window.
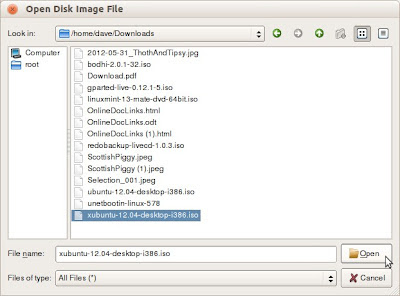
- Select Diskimage, and then click the Select disk image filebox ( ... ) at the right.

- Click Computer, double-click the unlabeled folder, double-click Home, double-click your home-folder name (such as Dave), double-click Downloads, select an ISO file to install onto your live USB drive, and then click Open.
- On the UNetbootin window, click OK to install UNetbootin and create a live USB drive. Be patient, this takes time.

- After the installation completes, remove your live USB drive, and then click Reboot Now.
Booting a UNetbootin live USB drive - After creating a live USB drive according to either procedure above, you can boot that live USB drive to evaluate and/or install your previously-chosen Linux operating system. To boot a live USB drive, do the following:
- Connect your live USB drive to a USB port on your PC.
- Boot according to the boot sequence on your particular PC. (Here are two possible examples: While your PC starts to boot, press F11 to display a Please select boot device window, and then select USB: UDB DISK. While your PC starts to boot, press F9to display a Boot Menu window, select Hard Disk, and then select USB-HDDO: UDB DISK 2.0 1.0.) Note: Write down the step-2 boot-sequence for your particular PC; you will need it each time you boot your live USB drive.
- Continue according to the Linux distribution that you have booted through your live USB drive.
Note:If you cannot boot your live USB drive, verify that the BIOS on your PC supports booting a live USB drive. Typically, you can access BIOS setup by pressing Delete while your PC starts to boot. Alternatively, you can test your live USB drive by trying to boot it on a separate PC.
Subscribe to:
Posts (Atom)
