Showing posts with label ubuntu. Show all posts
Showing posts with label ubuntu. Show all posts
Friday, April 29, 2016
Repairing frozen Dash in Ubuntu 12 10
Ubuntu 12.10 is the newest Ubuntu distribution of the Linux operating system. After you install or upgrade to Ubuntu 12.10, its Dash search window might not work correctly. Intermittently, Dash can freeze (hang up) after you type only a few characters into its search field. This document can probably help you repair Dash by installing a proprietary video driver.
Authors Note: I experienced this problem on my medium-powered (AMD dual-core, 2 GB memory), rebuilt PC, into which I had installed a new motherboard. I use this machine as my standby and experimental PC, on which I ran Ubuntu 12.04 with no Dash problems.
To repair frozen dash by installing a proprietary video driver, do the following:
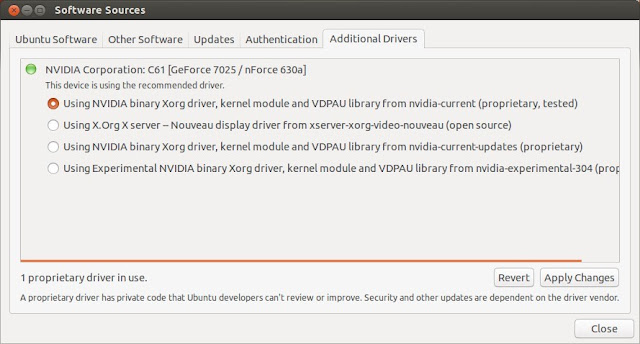
- In the launcher, click System Settings to display its window, click Software Sourcesto display its window, and then click the Additional Drivers tab to display its page.
- Select an appropriate driver, such as the NVIDIA binary Xorg - - (proprietary, tested) driver shown below, and then click Apply Changes.
- When prompted, type your password, and then click Authenticate.
- Close the Software Sources window.
- Reboot your PC.


How to restore Ubuntu 12 04 display resolution
Ubuntu 12.04 can lose its display resolution if it can no longer detect your display device. For example, the next time you boot your Ubuntu 12.04 PC, you might find that your display resolution has switched from 1280 x 960 to 800 x 600, which is nearly useless. Fortunately, this happens only rarely. In case you should be not so lucky, this document defines display resolution and explains how you might restore it in your Ubuntu 12.04 PC.
Note: Although this document applies specifically to Ubuntu 12.04, it also applies generally to other Ubuntu releases.
Defining display resolution
A 1280 x 960 (1280 columns by 960 rows of pixels) resolution displays 1,228,800 total pixels. In contrast, an 800 x 600 resolution displays only 480,000 total pixels, which reduces overall display resolution by 61%. For more information, please see Resolution, by Ted Hewitt at Riverside Community College.
A 1280 x 960 (1280 columns by 960 rows of pixels) resolution displays 1,228,800 total pixels. In contrast, an 800 x 600 resolution displays only 480,000 total pixels, which reduces overall display resolution by 61%. For more information, please see Resolution, by Ted Hewitt at Riverside Community College.
Restoring Ubuntu 12.04 display resolution
If you lose normal display resolution on your Ubuntu 12.04 PC, you might restore your resolution by re-enabling display detection as follows:
If you lose normal display resolution on your Ubuntu 12.04 PC, you might restore your resolution by re-enabling display detection as follows:
- Turn off your display, and then disconnect its AC power cord.
- After waiting longer than 15 seconds, reconnect the AC power cord to your display, and then turn it on.
- Reboot your Ubuntu 12.04 PC.
- As shown in Figure 1 below, in the launcher, click the System Settings icon to display its window.
- As shown in Figure 2 below, in the Hardware section, click the Displays icon to display its window.
- Click Detect Displays to detect your display.
- Select a resolution, such as 1280 x 960 (4:3), and then click Apply to change the resolution.
- If you like your selected resolution, click Keep This Configuration to display a window similar to Figure 3 below.
Note: For additional information about trouble-shooting Ubuntu display resolution, please see Why cant Ubuntu 12.04 detect my screen resolution?.
 |
Figure 1 - Clicking the System Settings icon in the launcher. |
 |
Figure 2 - Clicking the Displays icon in the System Settings window. |
 |
Figure 3 - This is the Displays window for an example restored resolution. |
Friday, April 22, 2016
Dual booting Ubuntu and Linux Mint
Most Linux enthusiasts know how to install both Linux and Windows on the same PC, and then boot either; this is known as dual booting (or multibooting). However, dual booting two Linux distributions is not as easy as dual booting one Linux distribution with Windows.
Ubuntu and Linux Mint are both popular Linux distributions. If you wish to compare them on the same PC (such as an older, spare PC), this document can help you dual boot them.
Creating a boot-repair live CD - Before you can dual boot Ubuntu and Linux Mint, you need to create a boot-repair live CD as follows:
- Download the newest boot-repair-disk.isodisc-image file.
- Burn (write) the ISO file to a blank, writable CD.
- Label your CD as "Boot Repair Disc."
Installing Ubuntu and Linux Mint - To install both Ubuntu and Linux Mint on the same PC, do the following:
- Download a 32-bit Ubuntu live-disc ISO file, burn it to a DVD, and then use that DVD to install Ubuntu as the only operating system.
- Install all Ubuntu updates, and then reboot your PC.
- Download a 32-bit Linux Mint live-disc ISO file, burn it to a DVD, and then use that DVD to install Linux Mint, as a second operating system, alongside Ubuntu.
- Install all Linux Mint updates, and then reboot your PC.
Note: Until after you have run your boot-repair CD according to the section below, you can boot only Linux Mint.
Running your boot-repair CD - Your boot-repair CD lets you repair your boot process, which includes the GRand Universal Bootloader (GRUB). To run your boot-repair CD, do the following:
- Install both Ubuntu and Linux Mint on the same PC according to the section above.
- Place your boot-repair CD into the optical drive, reboot your PC. and then follow the boot-repair prompts.
- As explained in the section above, boot your boot-repair disc as a live disc, and then follow its prompts.
- When you see the Boot Repair window, click Recommended repair (repairs most frequent problems). Be patient, each boot-repair phase usually requires more than the "several minutes" that it promises.


Tuesday, April 19, 2016
How to build a LAMP test website on Ubuntu
You can use a LAMP (Linux, Apache, MySQL, and PHP) test server on Ubuntu to develop a website on your computer before you upload it to a website host. To build a LAMP test website on your Ubuntu PC, you need to install LAMP and KompoZer, access your LAMP test website through root, edit your test website homepage, edit your test website new pages, and then test your website.
Installing LAMP and KompoZer
After installing LAMP and KompoZer, you can build and test a website in your LAMP test server on your Ubuntu PC. To install LAMP and KompoZer, do the following:
Accessing your LAMP test website as a root user lets you add and edit HTML files to expand and modify your test website. To access your LAMP test website, do the following:
 Initial LAMP Test Website
Note: For information about the testing.php file, see How to Set Up a LAMP Test Server on Ununtu.
Editing Your LAMP Test Website Homepage
Edit you LAMP test website home page according your requirements. For example, your homepage should include hyperlinks to other pages in your test website. This simple example has only a homepage and two other pages.
 Two New Pages on LAMP Test Website
Editing Your LAMP Test Website New Pages
Edit you LAMP test website new pages according your requirements. In each page, you should include links to Home and other pages in your test website. This simple example has only a homepage and two other pages.
Each time you finish editing any page on your LAMP test website, you should test that page by opening your test website in a web browser, such as Mozilla Firefox. In this simple example, you edited three pages. Therefore, you should test all three pages as follows:
Read more »
Installing LAMP and KompoZer
After installing LAMP and KompoZer, you can build and test a website in your LAMP test server on your Ubuntu PC. To install LAMP and KompoZer, do the following:
- Install LAMP according to the instructions in How to Set Up a LAMP Test Server on Ununtu.
- Click System, select Administration, click Synaptic Package Manager, and then enter your password to display the Synaptic Package Manager window.
- In the Quick search field, type kompozer to display its package.
- Select kompozer and then click Apply to install the free KompoZer web-authoring software. Alternatively, you can install Bluefish. However, KompoZer is easier to use.
Accessing your LAMP test website as a root user lets you add and edit HTML files to expand and modify your test website. To access your LAMP test website, do the following:
- Open Ubuntu, click Applications, select Accessories, and then click Terminal to display its window and a "~$" (tilde dollar-sign) prompt.
- At the flashing cursor immediately after the "~$" prompt, Type sudo nautilus to run Nautilus and display a root - File Browser window.
- Click File System, double-click var, and then double-click www to open it. As shown below, your www folder (your LAMP test website) should initially contain two files: index.html and testing.php.
Note: For information about the testing.php file, see How to Set Up a LAMP Test Server on Ununtu.
Editing Your LAMP Test Website Homepage
Edit you LAMP test website home page according your requirements. For example, your homepage should include hyperlinks to other pages in your test website. This simple example has only a homepage and two other pages.
- Access your test website through your root browser according to the section above.
- Right-click index.html, select Open with, and then click KompoZer to open it and display your initial homepage.
- Type over the first line ("It Works!") with This is Your Test Website Homepage!
- Type over the second line with Here is a link to New Page One. Select (highlight) New Page One, click Link to display a Link Properties window, type http://localhost/newpageone.html into the Link Location field, and then click OK to add the hyperlink and close the window.
- Add a new line and type Here is a link to New Page Two Select (highlight) New Page Two, click Link to display a Link Properties window, type http://localhost/newpagetwo.html into the Link Location field, and then click OK to add the hyperlink and close the window.
- Click File, and then click Save to save your new homepage in your LAMP test website.
- Click File; click Save As to display the Save Page As window; in the Name field, type newpageone.html; and then click Save to create your New Page One in your test website.
- Click File; click Save As to display the Save Page As window; in the Name field, type newpagetwo.html; and then click Save to create your New Page Two in your test website.
- Minimize the KompoZer window to redisplay the root www - File Browser. As shown below, your www folder (your LAMP test website) should now contain four files: index.html, newpageone.html, newpagetwo.html, and testing.php.
- Edit your test website new pages according to the section below.
Editing Your LAMP Test Website New Pages
Edit you LAMP test website new pages according your requirements. In each page, you should include links to Home and other pages in your test website. This simple example has only a homepage and two other pages.
- Redisplay the KompoZer window. Click File, click Open File to display the Open HTML File window, select newpageone.html, and then click Open to display the page in a new KompoZer tab.
- Type over the first line ("This is Your Test Website Homepage!") with New Page One!
- In the second line, type over New Page One with Home. Select (highlight) Home, click Link to display a Link Properties window, type http://localhost/index.html into the Link Location field, and then click OK to edit the hyperlink and close the window.
- Click File, click Open File to display the Open HTML File window, select newpagetwo.html, and then click Open to display the page in a new KompoZer tab.
- Type over the first line ("This is Your Test Website Homepage!") with New Page Two!
- In the second line, type over New Page One with Home. Select (highlight) Home, click Link to display a Link Properties window, type http://localhost/index.html into the Link Location field, and then click OK to edit the hyperlink and close the window.
- In the third line, type over New Page Two with New Page One. Select (highlight) New Page One, click Link to display a Link Properties window, type http://localhost/newpageone.html into the Link Location field, and then click OK to edit the hyperlink and close the window.
Each time you finish editing any page on your LAMP test website, you should test that page by opening your test website in a web browser, such as Mozilla Firefox. In this simple example, you edited three pages. Therefore, you should test all three pages as follows:
- Open your web browser, type http://localhost in its address line, and then press Enter to display your LAMP test website homepage.
- Click on the New Page One hyperlink to display your new page one, and then click on the Home hyperlink to display your home page.
- Click on the New Page Two hyperlink to display your new page two, and then click on the Home hyperlink to display your home page.
- Click on the New Page One hyperlink to display your new page one, and then click on the New Page Two hyperlink to display your new page two.
- Click on the New Page One hyperlink to display your new page one, and then click on the New Page Two hyperlink to display your new page two.
Monday, March 28, 2016
How to install TrueType fonts in Ubuntu
Microsoft TrueType fonts facilitate creating and editing documents that you can share among MS Windows and other operating systems. If you cannot successfully install TrueType fonts graphically, you can do so by command line.
Read more »
Installing Ubuntu TrueType fonts graphically - To install TrueType fonts graphically, through the Ubuntu Software Center, do the following:
- In the Launcher, click the icon for Ubuntu Software Center.
- Type installer truetype in the search field (at the upper right), select installer for Microsoft TrueType core fonts and then click More Info.
- Read the description of the Installer, and then click Install.
- Type your password and then click Authenticate.
- Accept the EULA licence terms, and then click Forward.
- Close all applications, reboot your PC and then verify you can apply TrueType fonts through an installed application, such as LibreOffice.
Installing Ubuntu TrueType fonts by command line - You might not be able to apply TrueType fonts after installing them graphically. If so, you need to remove the graphic installer for these fonts and then install them through the command line, as follows:
- Click the icon for Ubuntu Software Center, type installer truetype in the search field, select installer for Microsoft TrueType core fonts and then click Remove.
- Click the Dash icon (the Ubuntu logo at the top of the Launcher), type terminal to display its icon, and then click it to open the terminal.
- Type sudo apt-get install ttf-mscorefonts-installer to run the installation and then display a license-agreement window.
- Press Tab to select OK, and then press Enter.
- Press Tab (if necessary) to select Yes, and then press Enter.
- Close all applications, reboot your PC and then verify you can apply TrueType fonts through an installed application, such as LibreOffice.
Saturday, March 26, 2016
How to adjust the Ubuntu screen size
After you install an Ubuntu operating system on your computer, you might find that the Ubuntu desktop screen size is slightly too large to display completely. For example, the toolbar at the bottom of your Ubuntu desktop might be only partially visible, if at all. The possible solutions to this problem vary according to whether you have an LCD (flat) monitor or a CRT (glass) monitor.

If you have an LCD monitor, you have two possible solutions:
- Run "automatic configuration" to adjust the screen size on your LCD monitor.
- Activate a proprietary video-card driver.
If you have a CRT monitor, you have two possible solutions:
- Adjust screen size and position on a CRT monitor.
- Activate a proprietary video-card driver.
Running Automatic Configuration
Only an LCD monitor has an automatic-configuration button. Therefore, if you have a CRT monitor, you cannot run automatic configuration. To adjust the screen size on your LCD monitor through automatic configuration, do the following:
- Locate the automatic-configuration button. See the instructions that came with your LCD monitor.
- Press and release the automatic-configuration button to run automatic configuration and adjust screen size.
Activating a Proprietary Video-Card Driver
To activate a proprietary driver for your video card (or the built-in "video-card" circuitry on your motherboard), do the following:
- At the top of the Ubuntu desktop, click on System to display its drop-down menu.
- Select Administration to display its drop-down menu.
- Click on Hardware Drivers to first display a "Searching for available drivers window," and then after approximately 20 seconds, display a "Hardware Drivers" window.
- If the Hardware Drivers window lists only one proprietary video driver, select it to activate it. If the list contains more than one proprietary video driver, select the recommended (or newest) driver to activate it.
Adjusting Screen Size and Position
Only a CRT monitor has both "size" and "position" adjustment knobs. Therefore, if you have an LCD monitor, you cannot adjust screen size. To adjust screen size and position on a CRT monitor, do the following:
- Locate the horizontal-size, horizontal-position, vertical-size, and vertical-position adjustment knobs. You can usually find these knobs at the back, or under a cover at the front.
- Adjust the horizontal-size knob until you see a black stripe at either the left or right of the screen.
- Adjust the horizontal-position knob until you see identical black stripes at both sides of the screen.
- Repeat steps 2 and 3 until you see only thin, identical black stripes at both sides of the screen.
- Adjust the vertical-size knob until you see a black stripe at either the top or bottom of the screen.
- Adjust the vertical-position knob until you see identical black stripes at both the top and bottom of the screen.
- Repeat steps 5 and 6 until you see only thin, identical black stripes at both the top and bottom of the screen.
Thursday, March 24, 2016
Installing Chromium on Ubuntu 12 10
Chromium is the open-source browser on which Google bases its Chrome browser. Therefore, these browsers are nearly identical, and you can use Chromium in place of Chrome. In fact, you should do so on Ubuntu 12.10. If you try to install Chrome on a PC running Ubuntu 12.10, the installation halts and displays "The package is of bad quality" as shown in Figure 1 below.
 |
Figure 1 - A warning against installing Google Chrome on Ubuntu 12.10. You should instead install Chromium. |
This document explains how to remove Google Chrome (if installed), install Chromium, and then configure it.
Removing Google Chrome
In case you have installed Google Chrome on Ubuntu 12.10, you should remove it and then install Chromium according to the next section. To remove (uninstall) Google Chrome, do the following:
In case you have installed Google Chrome on Ubuntu 12.10, you should remove it and then install Chromium according to the next section. To remove (uninstall) Google Chrome, do the following:
- Open a terminal, type sudo apt-get install synaptic, type your password and then wait for Synaptic to install.
- Type sudo synaptic to display the Synaptic Package Manager window.
- Type google-chrome into the Quick filter search field.
- Right-click google-chrome-stable, click Mark for Complete Removal, click Apply to display a Summary window and then click Apply.
- Close both the Synaptic Package Manager window and the terminal.
Installing Chromium
To install Chromium on Ubuntu 12.10, do the following:
To install Chromium on Ubuntu 12.10, do the following:
- As shown in Figure 2 below; in the Unity launcher, click the Ubuntu Software Center icon to display its window.
- As shown in Figure 3 below, type chromium into the search field, select Chromium Web Browser and then click Install.
- Type your password and then click Authenticate to start the installation.
- After Chromium installs, close the Ubuntu Software Center.
- Configure Chromium according to the next section.
 |
Figure 2 - Opening the Ubuntu Software Center. |
 |
Figure 3 - Installing the Chromium Web Browser. |
Configuring Chromium
To configure Chromium on Ubuntu 12.10, do the following:
To configure Chromium on Ubuntu 12.10, do the following:
- Click Dash Home (at top of the launcher) and then click Chromium Web Browser as shown in Figure 4 below.
- Minimize the Chromium window; in the Unity launcher, right-click the Chromium icon; and then click Lock to Launcher as shown in Figure 5 below.
- Maximize the Chromium window, click sign in (at the upper right) to display the Sign in to Chromium window as shown in Figure 6 below.
- Type your email address, and then click either Sign in or Create a Google Account. If you already have a Google account, Chromium can synchronize your bookmarks, history, and settings.
- Click the three bars at the upper right, and then click Settings to display its window.
- Select Open a specific page or set of pages, click Set pages, select https//www.google.com/ and then click OK.
- As shown in Figure 7 below, scroll to Default browser, click Make Chromium my default browser and then close the Settings - Chromium window.
 |
Figure 4 - Opening Chromium through Dash. |
 |
Figure 5 - Locking the Chromium icon to the Unity launcher. |
 |
Figure 6 - Signing into Chromium, and syncing to your Google account. |
 |
Figure 7 - Making Chromium your default browser. |
Wednesday, March 23, 2016
Alternative disc burning software for Ubuntu 12 04
In the Ubuntu 12.04 distribution of the LInux operating system, Brasero Disc Burner is the default disc-burning software, which lets you write to (burn) any blank, writable disc (CD or DVD) that you place into your optical drive. If you have any problem with Brasero, you can install alternative disc-burning software, Xfburn.
To install Xfburn into Ubuntu 12.04 on your PC, do the following:
Read more »
To install Xfburn into Ubuntu 12.04 on your PC, do the following:
- In the Launcher, click on the Ubuntu Software Center icon.
- Type xfburn in the search field.
- Click Xfburn, and then click Install.
Note: Do not remove (uninstall) Brasero because you might need either Xfburn or Brasero or according to various circumstances. Either burner might work when the other cannot. For example, while making my first video, How to create a Redo live CD, I needed to burn several CDs while learning to make a correct screencast. To my frustration, after I burned one CD, Brasero would not let me burn another until I rebooted my PC. I later verified that I did not need to reboot my PC while burning multiple discs through Xfburner.
Sunday, March 13, 2016
Advice Upgrade from Ubuntu 12 04 ONLY after backup
If you are planning to upgrade from Ubuntu 12.04 to 12.10, please first perform a full-system backup. At least back up all your data. The upgrade might not work.
Today, 11-27-2012, after attempting to update my main PC from Ubuntu 12.04 to 12.10, I could not make Ubuntu 12.10 work correctly. Despite using the recommended "proprietary, tested" Nvidia display driver, I could not stabilize my display:
This failure to upgrade surprised me because I had successfully installed Ubuntu 12.10 (through a live disc) onto my standby PC. I needed only fix the frozen-Dash problem and disable the unwanted Amazon ads. For more information, please see: Fixing and customizing Ubuntu 12.10, Repairing frozen Dash in Ubuntu 12.10, and Disabling Amazon shopping results in Ubuntu 12.10.
Personally, I do not plan to upgrade from Ubuntu 12.04 until the next long-term-support release is available. Although this is unfortunate, I am still an Ubuntu fan. In my opinion, its 12.04 release is superior to all other Linux distributions.
Read more »
Today, 11-27-2012, after attempting to update my main PC from Ubuntu 12.04 to 12.10, I could not make Ubuntu 12.10 work correctly. Despite using the recommended "proprietary, tested" Nvidia display driver, I could not stabilize my display:
- The Unity launcher would not unhide smoothly.
- YouTube videos played in stop motion.
This failure to upgrade surprised me because I had successfully installed Ubuntu 12.10 (through a live disc) onto my standby PC. I needed only fix the frozen-Dash problem and disable the unwanted Amazon ads. For more information, please see: Fixing and customizing Ubuntu 12.10, Repairing frozen Dash in Ubuntu 12.10, and Disabling Amazon shopping results in Ubuntu 12.10.
Personally, I do not plan to upgrade from Ubuntu 12.04 until the next long-term-support release is available. Although this is unfortunate, I am still an Ubuntu fan. In my opinion, its 12.04 release is superior to all other Linux distributions.
Friday, February 26, 2016
How to install VitrualBox Ubuntu guest additions
This article defines VirtualBox Ubuntu guest additions, explains how to install them, and (if necessary) how to calibrate the Ubuntu video display.
What are VirtualBox Ubuntu Guest Additions?
VirtualBox Ubuntu guest additions are optional, supplemental software packages available through VirtualBox. You can install these guest additions after using VirtualBox to install Ubuntu as a guest operating system on a Windows XP host. Ubuntu guest additions enhance Ubunutu and make it easier to use. For example, after you install the Ubuntu guest additions, you can:
- Move the mouse pointer between Windows XP and Ubuntu without first pressing a key to switch between the operating systems.
- More easily change the Ubuntu screen size.
Installing Ubuntu Guest Additions
To install Ubuntu guest additions, do the following:
- Install your Ubuntu guest operating system, boot it, and install all its recommended updates according to the procedure in How to Install Virtual Ubuntu on XP.
- Press the right Ctrl key to switch the mouse and keyboard to your XP host, click on Devices to display its menu, and then click on Install Guest Additions to place the VBOXADDITIONS_3 icon on your Ubuntu desktop and display its window.Press the right Ctrl key to switch the mouse and keyboard to your Ubuntu guest, and then click OK to close the "VBOXADDITIONS_3" window.
- Double-click on VBOXADDITIONS_3 icon to display the "File Browser" window, and then copy VBoxLinuxAdditions-x86.run to your home folder.
- Click on Applications to display its menu, click on Accessories to display its menu, click on Terminal to open its window, and then type (after the "$" prompt) sudo chmod +x VBoxLinuxAdditions-x86.run, press Enter to display a password prompt, and then press Enter to display the "$" prompt.
- Type sudo apt-get install dkms.gcc, press Enter to display "Do you want to continue [Y/n]?" Press Y, and then press Enter to update kernel packages through DKMS (Dynamic Kernel Module Support) and display the "$" prompt.
- Type sudo apt-get install linux-hearders-$(uname -r), press Enter to install Linux headers and display the "$" prompt, type sudo ./VBoxLinusAddtions-x86.run, and then press Enter to install the guest additions and display the "$" prompt.
- Close the "Terminal" window, restart Ubuntu to display a "VirtualBox-Information" window that explains "mouse pointer integration," and then click OK to close the information window.
Calibrating Your Ubuntu Video Display
Hardware capabilities vary among PCs. Therefore, after you install Ubuntu guest additions, your Ubuntu guest operating system might not display its windows correctly. For example, after you switch from Ubuntu to XP, and then back again, the Ubuntu window might be partially blank. If you think that calibrating your Ubuntu video display might improve it, try the following procedure:
- Double-click on the Sun VirtualBox desktop icon to open its window.
- Click on the Settings icon (orange gear) to display its window; in the left frame, select Display, to display its "Video" page.
- Adjust the Video Memory setting if you think doing so might improve your Ubuntu video display. You can experiment with this setting, and then reset it later.
- Turn off (uncheck) Enable 3D Acceleration if you think doing so might improve your Ubuntu video display. You can experiment with this setting, and then reset it later.
- Shut down your Ubuntu guest, and close the "Sun VirtualBox" window.
- Repeat steps 1 through 5, experimenting with the settings in steps 3 and 4, until you have calibrated your Ubuntu video display to your satisfaction.
Thursday, February 25, 2016
Networking Ubuntu 9 10 and Windows XP
This article explains how to share files and folders between your Ubuntu 9.10 computer and your Windows XP computer through your wired, ethernet home network. For background information and additional details, see Mount samba shares with utf8 encoding using cifs. Though this background information focuses on servers, it also applies to workstation computers. Therefore, procedures and examples in the article below focus on networking Ubuntu 9.10 and Windows XP computers.
To network Ubuntu 9.10 with Windows XP, you need to perform two procedures:
To set up Windows XP to share documents with Ubuntu through your wired, ethernet home network, do the following:
To set up Ubuntu to share documents with Windows XP through your home network, do the following:
Read more »
To network Ubuntu 9.10 with Windows XP, you need to perform two procedures:
- On your XP computer, use the Set Up Sharing on Windows XP procedure below to share your XP Shared Documents folder with all network users.
- On your Ubuntu computer, use the Set Up Sharing on Ubuntu procedure below to create a share point, which is a desktop icon through which you have read and write access to the Shared Documents folder on your XP computer.
To set up Windows XP to share documents with Ubuntu through your wired, ethernet home network, do the following:
- On your Windows XP computer, click My Computer to display its window.
- Right-click Shared Documents, click Properties to display its window, and then click Sharing to display its page.
- In the "Network sharing and security" frame:
- Select Share this folder on the network.
- Write down the Share name, which is "SharedDocs" in this example. You will need the Share name when you perform the Set Up Sharing on Ubuntu procedure below.
- Select Allow network users to change my files.
- Click Apply to set folder permissions, and then click OK to close the window.
- Click Start, click Settings, and then click Control Panel to display it.
- Double-click System to display its window, and then click Computer Name to display its page.
- Write down the contents of the Full-computer-name field, which is "alpha" in this example. You will need the Full computer name when you perform the Set Up Sharing on Ubuntu procedure below.
To set up Ubuntu to share documents with Windows XP through your home network, do the following:
- On your Ubuntu computer, click Applications, select Accessories, click Terminal to display its window, and then do the following:
- Type sudo aptitude install smbfs, press Enter, type your password, press Enter again, follow the prompts, and then to install the smbfs packages, which you need for sharing files on the network.
- Type sudo mkdir /media/ubuntusharename, and then press Enter to name the share icon that will be on the Ubuntu desktop. Use a meaningful name for the ubuntusharename. This example uses "betashare" because the Ubuntu computer name is beta.
- Type sudo nano /etc/nsswitch.conf, and then press Enter to display the nsswitch configuration file through the nano editor.
- On the Hosts line, use the arrow keys to move your cursor to the "d" in dns on the hosts line, type wins and a space immediately before dns so that the hosts line is
hosts: files mdns4_minimal [NOTFOUND=return] wins dns mdns4. - Press Ctrl+X, type y, and then press Enter to save your edits and close the nano editor.
- Type sudo aptitude install winbind, and then press Enter to install windbind.
- Close the terminal window, and then turn off your Ubuntu computer completely.
- Turn your Ubuntu computer back on, click Applications, select Accessories, click Terminal to display its window, and then do the following:
- Type sudo cp /etc/fstab /etc/fstab_old, and then press Enter to back up your fstab file. Do not skip this step because fstab is an important system file. In case you need to recover fstab, use the following command: sudo mv /etc/fstab_old /etc/fstab.
- Type sudo nano /root/.smbcredentials, and then press Enter to display your credentials file, which might be empty.
- Add two lines to your credentials file:
username=winusername
password=winpassword
Replace winusername with your user name on your Windows XP computer. Replace winpassword with your Windows XP password. - Press Ctrl+X, type y, and then press Enter to save your edits and close the nano editor.
- Type sudo chmod 700 /root/.smbcredentials, and then press Enter so that only root can access your credentials file.
- Type sudo nano /etc/fstab, and then press Enter to display your fstab file. At the bottom of the file, add the following line:
//wincomputername/winsharename /media/ubuntusharename cifs guest,rw,iocharset=utf8,file_mode=0777 0 0
Replace wincomputername with your Windows XP Full computer name, which is "alpha" in the Set Up Sharing on Windows XP procedure above. Replace winsharename with your Windows XP Share name, which is "SharedDocs" in the Set Up Sharing on Windows XP procedure above. Replace ubuntusharename with your Ubuntu share name, which is "betashare" in this example. Therefore, this line on the example Ubuntu computer is:
//alpha/SharedDocs /media/betashare cifs guest,rw,iocharset=utf8,file_mode=0777 0 0 - Press Ctrl+X, type y, and then press Enter to save your edits and close the nano editor.
- Type sudo mount -a, and then press Enter to display your Ubuntu-share icon on your Ubuntu desktop.
- Close the terminal window, and then double-click your Ubuntu-share icon to open it. It should contain the same folders and files as the Shared Documents folder on your Windows XP computer.
Friday, February 12, 2016
How to install Wine on Ubuntu
Wine is free software that lets you run Microsoft Windows applications under a Linux operating system, such as Ubuntu. Windows and its applications are very expensive. When you upgrade to a new Windows operating system, you often need to also buy new Windows applications. In contrast, Both Ubuntu and Wine are free, and Wine can help you save money by letting you run many of your existing Windows applications under Ubuntu for as long as you wish. For more information, see Wine (software) - Wikipedia and WineHQ - About Wine.

To install Wine on Ubuntu, do the following:
- Select System > Administration > Synaptic Package Manager to display its window.
- In the "Quick search" field, type wine, and then click Search to display packages that include "wine" in their titles.
- Select wine, click on Mark for installation to display the "Mark additional required changes?" window, and then click Mark to close that window and mark "wine" in the Synaptic Package Manager window.
- Click Apply to display the "Apply the following changes?" window, and then click Apply to download and install the Wine packages.
- On the "Changes applied" window, click Close to close that window.
- Close the Synaptic Package Manager.
To test your Wine installation, do the following:
- Select Applications > Wine > Programs > Accessories > Notepad to start a clone of Windows Notepad and open its window.
- Type test, click File to display its menu, and then click Save to display its window.
- In the "File name" field, type test.txt, and then click Save to store then file in your home folder.
- Close the Notepad window.
- Select Places > Home Folder to display its "(your name) - File Browser" window.
- Right-click test.txt to display it menu, and then click Open with Other Application to display its window.
- Scroll down to and select Wine Windows Program Loader, and then click Open to display the "test.txt - Notepad" window.
Thursday, February 11, 2016
Problems with OpenOffice org on Ubuntu 10 4
If you are experiencing problems running OpenOffice.org under Ubuntu 10.4, you might be able to solve those problems by simply installing the OpenOffice.org Office Suite over your current OpenOffice.
After recently updating my PC to Ubuntu 10.4, I discovered I could not install the LanguageTool grammar-checker extension for Writer (the OpenOffice.org word processor). Also, I could not export an ODT file as an XHTML file. I found the solution to both problems accidentally. While looking for any Ubuntu software that might help, I stumbled upon OpenOffice.org Office Suite. Installing this suite over my existing OpenOffice repaired both problems.
For more details, please see my Associated Content document, How to Repair OpenOffice.org On Ubuntu 10.4.
Read more »
After recently updating my PC to Ubuntu 10.4, I discovered I could not install the LanguageTool grammar-checker extension for Writer (the OpenOffice.org word processor). Also, I could not export an ODT file as an XHTML file. I found the solution to both problems accidentally. While looking for any Ubuntu software that might help, I stumbled upon OpenOffice.org Office Suite. Installing this suite over my existing OpenOffice repaired both problems.
For more details, please see my Associated Content document, How to Repair OpenOffice.org On Ubuntu 10.4.
Friday, January 29, 2016
How to repair GRUB 2 for Ubuntu dual boot
The GRand UnifiedBootloader (GRUB 2) in Ubuntu lets you dual boot Ubuntu and another operating system. For example, you might install Ubuntu "alongside" either Microsoft Windows or Linux Mint. If you cannot dual boot, you might correct the problem by repairing GRUB 2.
Somehow, by default, the GRUB 2 graphics mode (GFXMODE) has been disabled and set to a low resolution that is invalid for most PCs. Therefore, you need to enable GRUB_GFXMODE and set it to a valid resolution. To repair GRUB 2 in Ubuntu, do the following:
- Reboot your PC to make sure it boots to Ubuntu without first displaying the GNU GRUB screen.
- Click the icon at the top of the Launcher to open the Dash window, type terminal in the Search field, and then click the Terminal application to open it.

- Type gksu gedit, press Enter, type your password, and then click OK.
- Click Open, click File System, double click etc, scroll to and double-click default, and then double-click grub.


- Scroll to #GRUB_GFXMODE=640x480, and then edit it to GRUB_GFXMODE=1024x768. Important: You need also enable GRUB_GFXMODE by removing its preceding # symbol.

- Save grub, close gedit and then, for the Untitled Document, click Close without saving.
- In the Terminal, type sudo update-grub, press Enter, wait until the Terminal indicates that the update is "done," and then close the Terminal.
- Reboot Ubuntu to display the GNU GRUB menu, which lets you boot to either Ubuntu or your other operating system.
Subscribe to:
Posts (Atom)
