Showing posts with label creating. Show all posts
Showing posts with label creating. Show all posts
Thursday, April 21, 2016
Creating and booting a UNetboootin live USB drive
You can use a bootable, live CD to evaluate and/or install any distribution of a Linux operating system. Alternatively, you can use a bootable, live USB drive for testing and installing Linux. This document explains how to create a live USB drive through the UNetbootin utility running under either Windows 7 or Linux, and then boot that live USB drive on almost any PC. While creating your live USB drive, you can either select a Linux distribution through UNetbootin or use an ISO file that you have previously downloaded.
Note:You can use either a live CD or a live USB drive to scan for viruses in a PC that runs Windows 7, or earlier. Please see Using Linux to rescue Windows.
Creating a live USB drive through Windows - If you are running Windows on your PC, you can create a live USB drive for evaluating any Linux distribution. For example, if you are running Windows 7 on your PC, you can do the following:
- Connect a USB drive to a USB port on your PC. It should display UDISK in an AutoPlay window.

- Go to unetbootin.scourceforge.net, and then click Download (for Windows).

- Open your Downloads folder, double-click unetbootin-windows-578.exe, and then click Yes (in the User Account Control window) to display the UNetbootin window.

- Select Distribution, select a Linux distribution, such as Puppy Linux, and then click OK to download and install UNetbootin and create a live USB drive. Be patient, this takes time.


- After the installation completes, remove your live USB drive, and then click Reboot Now.

- Connect a USB drive to a USB port on your PC.
- Go to unetbootin.scourceforge.net, and then click Download (for Linux).
- Open your Downloads folder, right-click unetbootin-linux-578, click Properties, click Permissions, click the Allow executing file as a program checkbox, and then close the Properties window.

- Double-click unetbootin-linux-578, type your password, and then click OKto display the UNetbootin window.
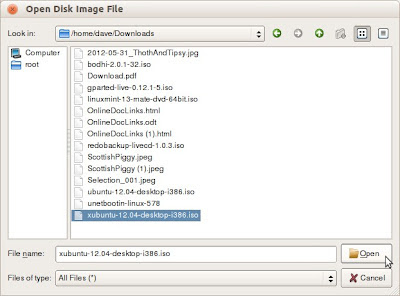
- Select Diskimage, and then click the Select disk image filebox ( ... ) at the right.

- Click Computer, double-click the unlabeled folder, double-click Home, double-click your home-folder name (such as Dave), double-click Downloads, select an ISO file to install onto your live USB drive, and then click Open.
- On the UNetbootin window, click OK to install UNetbootin and create a live USB drive. Be patient, this takes time.

- After the installation completes, remove your live USB drive, and then click Reboot Now.
Booting a UNetbootin live USB drive - After creating a live USB drive according to either procedure above, you can boot that live USB drive to evaluate and/or install your previously-chosen Linux operating system. To boot a live USB drive, do the following:
- Connect your live USB drive to a USB port on your PC.
- Boot according to the boot sequence on your particular PC. (Here are two possible examples: While your PC starts to boot, press F11 to display a Please select boot device window, and then select USB: UDB DISK. While your PC starts to boot, press F9to display a Boot Menu window, select Hard Disk, and then select USB-HDDO: UDB DISK 2.0 1.0.) Note: Write down the step-2 boot-sequence for your particular PC; you will need it each time you boot your live USB drive.
- Continue according to the Linux distribution that you have booted through your live USB drive.
Note:If you cannot boot your live USB drive, verify that the BIOS on your PC supports booting a live USB drive. Typically, you can access BIOS setup by pressing Delete while your PC starts to boot. Alternatively, you can test your live USB drive by trying to boot it on a separate PC.


Sunday, April 10, 2016
CREATING A DURIAN PATTERN DESIGN IN MS WORD PART 1
MICROSOFT WORD DRAWING PROJECT No. 44
TITLE: CREATING A DURIAN PATTERN DESIGN IN MS WORD PART 1
TYPE: GRAPHIC DESIGN
A pattern is a design made from repeated shapes and lines which are arranged in a regular structure. Nature has always been a popular source for ideas. I often use natural objects as inspiration for most of my works. In this project, I have designed a pattern using the durian as the motif based on a grid that is suitable to decorate a fruit stall plastic shopping bag or a tablecloth. The pattern is repeated many times and arranged using the grid (squares) as a guide. The durian is a tropical fruit and it is very popular in South-East Asia. Even though it has a hard spiny shell and strong aroma, the fruit tastes great. Here are some pictures of the durian fruit.


The steps to create this pattern are as follows:
a) Draw a round shape with the Curve line tool.
b) Use the Freeform tool to draw some spines around the shape and then
send it to the back.
send it to the back.
c) Use the Curve line tool to complete the other details such as the cavities
and the pulp.
and the pulp.
d) Finally, render the drawing with colours with Shape Fill and Shape Outline.

This is just an example of a durian pattern design.

The tablecloth or shopping bag can be decorated with patterns of durian motif.
Tuesday, April 5, 2016
Creating Custom Brush in Illustrator

Adobe Illustrator can be compared to a programming tool in that sense, it provides a lots of ways to customize your graphics works. It provides so many designing options which you hardly get in other graphics tools. In this lesson, you will learn how to create amazing brushes within few minutes!
Today Im gonna talk about how to create custom brushes - Scatter Brush, Art Brush & Pattern Brush. After creating these brushes, you can use them as borders for different shapes such as triangle or oval etc.
Note: This tutorial applies to all versions of Adobe Photoshop. However Ive prepared this tutorial using Illustrator CS6.
Okay lets start -

Run Adobe Illustrator from your PC. Now look at the tools panel and find the Paintbrush Tool (See the image on the left). I will create two little objects with this tool which later will be used to create awesome brushes.
Go to the File Menu > New > Create a new document of any size.
Hit on the Paintbrush Tool and draw an object (I sketched something like a leaf) as shown in the image below.

- Now select it through selection tool
- Press Alt key and drag it to create a copy of it.
- Now select the second leaf again and rotate it, place it over the first leaf so that they look like attached.
- Again select the first leaf > Double click on Fill Color from the bottom of tools panel > Choose Red.
- Similarly, select the second leaf and choose green color for it.
- It should look like as below

Now the first but the difficult part has been completed. Now youre ready to have fun in the next step.
Creating Brushes
You will be able to create brushes from the above leaves. First, make sure the brush window is open on your document. Or go to the Window menu and choose Brushes.
- Select both leaves through selection tool
- Go to the Brushes window and click on New Brush Icon (Look at the image below)

- Choose Scatter Brush > Rename it if necessary > Change the values of different fields if necessary > Hit OK
- Again choose New Brush (Leaves must be selected) > Choose Art Brush > You can change the size and direction > Hit OK
- Click on New Brush again > Choose Pattern Brush > Hit OK
- Now youve three custom brushes. Lets apply them :)
Applying the Brushes to Shapes
Before creating shapes, make sure your fill color is white. So that you can clearly understand the effects of different brushes.
Now choose Ellipse Tool (Oval) from the shape. Press Shift key and draw a circle. Now go to the brush window and Apply your newly create Art Brush. The circle will look like as below!

Create another circle. And this time you should test the pattern brush.

How is it? :)
In this way, you can also apply this trick to different shapes such as triangle, star, rectangle etc.
Here Ive just illustrated a simple example of customizing the brush. In this system, you can create numerous brush designs. And can you imagine how much designing options are available in whole illustrator? Simply Ive no idea. There could be millions!!!
It takes my whole evening to prepare this tutorial. Please inform me whether you like it or not. :)
Stay with Marks PC Solution to get more interesting IT topics!
Thursday, March 24, 2016
CREATING A DURIAN PATTERN DESIGN IN MS WORD PART 2
MICROSOFT WORD DRAWING PROJECT No. 44
TITLE: CREATING A DURIAN PATTERN DESIGN IN MS WORD PART 2
TYPE: GRAPHIC DESIGN
It is durian season now and there are many durians being sold at the roadside stalls and markets. Durian trees do not bear fruit throughout the year. At the peak of the season when there is an abundant supply of the fruit, they are sold at a much cheaper price. Here is another example of a pattern design using two different images. The design is used to decorate an apron. I have applied the principle of variety to this design by incorporating two different images in it. Adding the principle of variety to the design, which is one of the aspects in Basic Design Principles, makes it look more interesting. Remember the movie posters that are displayed at the cinemas? Do you know that a movie poster is actually designed with a montage of images taken from various scenes in the movie? A movie poster has the ability to grab our attention from the first look and also able to convey the message effectively. Such results are made possible with the application of Basic Design in the graphic design process.


This apron has a pattern design on it. Warm and cool colours were used to create a contrasting visual effect in the design.
Creating daily activity logs through MS Excel
Excel is the spreadsheet application in the Microsoft Office productivity suite. You can use Excel to generate daily activity (task) logs. This document explains how to:
- Create your base log, which is a simple Excel spreadsheet that serves as a template for your daily activity logs.
- Create and use daily activity logs, each of which starts as a copy of your base log. For each activity or task that you log, you need enter only a category, a brief description and an ending time. The spreadsheet automatically calculates starting time, activity interval, and total daily time.
- Create your PDF daily activity log.
- Cover your assets (CYA).
Note: Although this document applies specifically to creating daily activity-log spreadsheets through MS Excel, it applies generally to creating activity logs through other spreadsheet applications, such as LibreOffice Calc and Google Drive Spreadsheet.
Creating your base log
Creating your base log
To create your base log, you need to format it and then add its formulas.
Formatting your base log - Your base log requires six columns (A through F) and four rows (1 through 4). To format your base log, do the following:
- Open a new MS Excel file, rename its worksheet as DailyLog, and then save the spreadsheet as BaseLog.xls.
- Select cells A1 through C1, select HOME (in the toolbar) to display its ribbon, and then click the Merge & Center icon (at the right in the Alignment frame).
- Adjust the width of column D, making it wider so you can type activity descriptions.
- Merge cells E1 and F1.
- Select cells A1 through F2 and then format them as Ariel, 12 points and bold.
- In rows 1 through 4, type text as shown in Figure 1 below.
- Select cells A3 through B4, select HOME, click the arrow at the right of Number, select Time, select 1:30 PM, and then click OK to format cells A3 through B4 for 12-hour time. Note: If you prefer 24-hour time, select 13:30.
- Select cells E3 through F4, select HOME, click the arrow at the right of Number, select Time, select 13:30, and then click OK to format cells E3 through F4 for hours and minutes (no AM or PM).
 |
Figure 1 - Formatting your base-log spreadsheet. |
Adding base-log formulas - To add formulas to your base log, do the following:
- Format you base log according to the procedure above.
- Select merged cells E1 and F1, type =today() into the function (fx) bar, and then press Enter.
- Select cell A3, type your typical first-activity start time, such as 8:00 am.
- Select cell B3, type your typical first-activity end time, such as 8:15 am.
- Select cell A4, type =b3 into the function bar, and then press Enter.
- Select cell E3, type =b3-a3 into the function bar, and then press Enter.
- Select cell F3, type =e3 into the function bar, and then press Enter.
- Select cell E3, copy it and paste it into cell E4.
- Select cell F4, type =sum($e$3:e4) into the function bar, and then press Enter. Your base log should now display as shown in Figure 2 below.
- Save your BaseLog.xls, and make at least one backup copy.
 |
Figure 2 - Adding formulas to your base log. |
Creating and using your daily logs
To create and use your daily activity logs, you need to create a new log at the start of each day. For an example daily activity log, see Figure 3 below. To create each daily log, do the following:
- Open your BaseLog.xls Excel spreadsheet file, and then save it with a file name that includes the current date and your name, such as 2012-10-11_Your_Name_Log.xls.
- Modify cells A3 through D3 to log the your first daily activity.
- Describe your next activity in cells C4 and D4, and then, when done, record its end time in cell B4.
- Copy row 4, paste it into row 5, and then modify cells B5 through D5 to log your next activity. Note: Modify cells only in columns B through D; spreadsheet formulas update other cells automatically.
- For each subsequent activity, copy your last row, paste it into the next, and then modify its cells in columns B through D.
- At the end of the day, make at least one backup copy of your daily activity log.
 |
Figure 3 - Example daily activity log. |
Creating your PDF daily activity log
To create your PDF daily activity log, do the following:
- Open your Excel daily activity log, such as 2012-10-11_Your_Name_Log.xls.
- Click the Office Button(at the upper left), to display its menu.
- Select Save As, click PDF or XPS, and select the PDF file type.
- Click Publish to generate your PDF daily activity log, such as
2012-10-11_Your_Name_Log.pdf.
Covering your assets (CYA)
Your daily activity logs can help you practice prudent CYA. For example, at the end of each day, you can:
Your daily activity logs can help you practice prudent CYA. For example, at the end of each day, you can:
- Create a PDF daily activity log according to the section above.
- Create a PDF status report according to Creating a cumulative status report through MS Word.
- Send an email to all your managers, and attach both PDFs.
- Make personal backup copies of both PDFs, and file them in private storage.
Tuesday, March 22, 2016
Creating a cumulative status report through MS Word
Word is the word-processor application in the Microsoft Office productivity suite. You can use Word to generate a cumulative status report that lets you continually update your assigned tasks and cover your assets (CYA). This document explains how to:
- Create your cumulative status report, which is a simple Word table that lets you track the status of your projects, assignments and tasks.
- Format your status-report table.
- Enter task data into your status report table.
- Create a PDF status report.
- Cover your assets (CYA).
Creating a status-report table
To create a simple table for your cumulative status report, do the following:
To create a simple table for your cumulative status report, do the following:
- Open a new MS Word file, and then save it with a meaningful name, such as Cumulative_Status_Report.docx.
- As shown in Figure 1 below, click the Page Layout tab to display its ribbon, click Margins, and then select Narrow.
- As shown in Figure 2 below, click Orientation, and then select Landscape.
- As shown in Figure 3 below, click Insert, click Table, and then click Insert Table to display its window.
- As shown in Figure 4 below, select seven columns and two rows, and then click OK to create your table.
 |
| Figure 1 - Selecting Narrow page margins. |
 |
| Figure 2 - Setting page orientation to Landscape. |
 |
| Figure 3 - This is the Insert Table window. |
 |
| Figure 4 - Inserting a table with seven columns and two rows. |
Formating your table
To format your status-report table, do the following:
To format your status-report table, do the following:
- Select the Layout tab to display its ribbon, click Select (at the left), click Select Table, and then click Cell Margins (in the Alignment section) to display a Table Options window. Note: For more information about tables and ribbons, please see Using Word 2007 ribbons for tables.
- As shown in Figure 5 below, set all four Default cell margins to 0.05 inches, and then click OK. Authors Note: In my opinion, these cell margins make the table easier to read.
- Place the insertion point (blinking cursor) in any cell in the first row, select the Layout tab, and then click Properties to display its window.
- As shown in Figure 6 below, select the Row tab, deselect (uncheck) Allow row to break across pages, select (check) Repeat as header row at the top of each page, and then click OK.
- Select the entire first row, click the Home tab to display its ribbon, and then click Bto make the first row (the header row) bold.
- Leaving the header row selected, click the Layout tab to display its ribbon, and then (in the Alignment section) click the Align Center icon to align header text both horizontally and vertically.
- As shown in Figure 7 below, type appropriate text into the header row, and then adjust column widths.
- Select the entire second row. In the Alignment section, click the Align Center Left icon to align task text to the left and vertically, and then use Align Center to align each Date cell both horizontally and vertically.
 |
| Figure 5 - Set all four cell margins to 0.05 inches. |
 |
| Figure 6 - Repeat the table header on each page. |
 |
| Figure 7 - Type text into the header row. |
Entering task data
To enter task data into your status-report table, do the following:
To enter task data into your status-report table, do the following:
- As shown in Figure 8 below, enter data for your initial task into the second row.
- As shown in Figure 9 below, click the Layout tab to display its ribbon, place the insertion point (blinking cursor) anywhere in the second row, and then (in the Rows & Columns section) click Insert Above to insert a new row.
- As shown in Figure 10 below, enter data for your next assigned task into the second row, which is your new blank row.
- For each other in-process task on which you have worked, revise its Date of latest activity.
- Repeat steps 2 through 4 for each new task that any manager assigns to you. Figure 11 below contains additional example tasks.
 |
| Figure 8 - This is an example initial task. |
 |
| Figure 9 - A new second row for the next task. |
 |
| Figure 10 - An example new task. |
 |
| Figure 11 - Multiple example tasks. |
Creating a PDF status report
To create a PDF cumulative status report, do the following:
To create a PDF cumulative status report, do the following:
- Open your Word cumulative status report.
- Click the Office Button (at the upper left), to display its menu.
- Select Save As, click PDF or XPS, and select the PDF file type.
- Click Publish to generate your PDF cumulative status report, such as
2012-11-23_Your_Name_Status_Report.pdf.
Covering your assets (CYA)
Your cumulative status report can help you practice prudent CYA. For example, at the end of each day, you can:
Your cumulative status report can help you practice prudent CYA. For example, at the end of each day, you can:
- Create a PDF cumulative status report according to the section above.
- Create a PDF daily activity log according to Creating daily activity logs through MS Excel.
- Send an email to all your managers, and attach both PDFs.
- Make personal backup copies of both PDFs, and file them in private storage.
Subscribe to:
Posts (Atom)
