Showing posts with label installing. Show all posts
Showing posts with label installing. Show all posts
Thursday, April 28, 2016
Installing Xubuntu
Based on Ubuntu, Xubuntu is a lean distribution of the LInux operating system that:
Notes:
Installing Xubuntu on your PC - To install Xubuntu through its bootable disc, do the following:




Read more »
- Lets you access your applications through traditional menus, providing an alternative to other operating systems that access applications differently.
- Runs well on older or slower PCs. Why discard a PC simply because it is too slow for MS Windows?
Notes:
- The procedures for installing Xubuntu are similar to those for Ubuntu.
- For more information, please see Getting started with Xubuntu.
Creating an Xubuntu bootable disc - You create an Xubuntu bootable disc (live CD or DVD) by downloading and then burning an ISO file. To create an Xubuntu bootable disc, do the following:
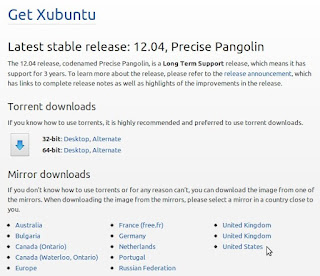
- Go to the Xubuntu website, click Get Xubuntu, and then click a download mirror according to your region, such as the United States. Alternatively, you can use a torrent download.
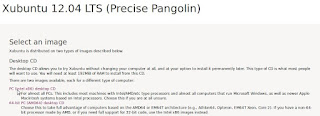
- Click on PC (Intel X86) desktop CD to download its ISO image. Alternatively, you can select 64-bit PC (AMD64) desktop CD.
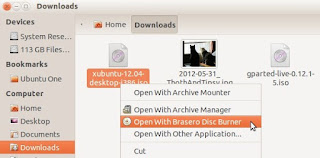
- In your Downloads folder, right-click the image file, such as xubuntu-12.04-desktop-i386.iso, and then select a disc burner, such as Brasero.
- Place a blank, writable CD or DVD into your optical drive, and burn your Xubuntu bootable disc.
- Place your Xubuntu bootable disc into the optical drive on your PC, and then reboot it.
- Click Install Xubuntu to start the installation process. Note: You can first try Xubuntu by running it from its live CD. This does not disturb your current operating system.
- Select an installation type, and then click Continue.
- When your are ready to install Xubuntu, click Install Now.
- Select your time zone, and then click Continue.
- Either accept the default keyboard layout, English (US), or select another according to your requirements, and then click Continue.
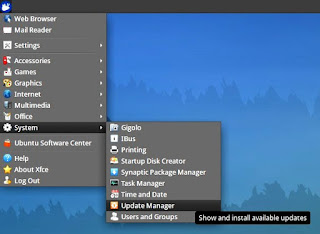
- Type your user name, create a password, and then click Continue.At the upper-left desktop corner, click the Applications Menu (mouse) icon, select System, click Update Manager, and then install all updates.

Sunday, April 24, 2016
Dot Net Framework 3 5 Not Installing on Windows 8 Fix it Now!

You may face a common problem while using Windows 8. Microsoft .Net Framework 3.5 is not installed with Windows 8. And several programs may ask you install this. And you cant install this from your PC. It will ask you to connect to the net and use Windows Update.
By default Windows 8 comes with .Net Framework 4.5 and it doesnt include 3.5. When you try to install .Net 3.5 that you previously downloaded from web the you will see the following message.

And you will get the same message while installing some some programs that is developed using .Net 3.5 platform. And you will not able to run those programs on your PC! This is a very bad job by Microsoft. A great trouble for Windows 8 users.
But today you will get the solution. Youve install this using command line. I mean you have to use Command Prompt. And surprisingly you Windows 8 DVD includes the .Net Framework 3.5!
Method 1 (Offline Installation using cmd):
- Enter your Windows 8 Installation Disk on DVD Drive.
- Now run Command Prompt as Administrator. (Hint: Start > Type cmd > Now right click on Command Prompt and hit on Run as Administrator from the bottom)
- Now copy the following command and paste it in the command prompt window. Or type the following line in command prompt. Press Enter (To paste the command in command prompt, click the right button of mouse and select paste)
- Now .Net Framework will be installed within few minutes.
DISM /Online /Enable-Feature /FeatureName:NetFx3 /All /LimitAccess /Source:h:sourcessxs
Remember: h is the drive letter of DVD drive. Change it with your DVD drive letter.
Method 2 (Online Method using Windows Update):
If you follow all the instructions of method 1 you will be able to install .net 3.5 properly. But if there is any problem for example- you dont have DVD drive, or your Windows DVD doesnt contain it then you can install it directly from Windows Update option. More or less youve to download 200 MB data from internet.
Follow the instruction below:
Secret Tips: If you upgrade to Windows 8 from Windows 7, then you get .Net Framework 3.5 automatically enabled !!
Installing a Windows language pack on Windows 8 before installing the .NET Framework 3.5 will cause the .NET Framework 3.5 installation to fail. Install the .NET Framework 3.5 before installing any Windows language packs.
Method 2 (Online Method using Windows Update):
If you follow all the instructions of method 1 you will be able to install .net 3.5 properly. But if there is any problem for example- you dont have DVD drive, or your Windows DVD doesnt contain it then you can install it directly from Windows Update option. More or less youve to download 200 MB data from internet.
Follow the instruction below:
Control Panel > Programs and Features > Turn Windows Features on or off > Mark the option .NET Framework 3.5 (includes .NET 2.0 and 3.0) > OK.Now you will see a window like the image above. Hit on Install This Feature. And make sure youre connected to the net. Thats it.
Secret Tips: If you upgrade to Windows 8 from Windows 7, then you get .Net Framework 3.5 automatically enabled !!
Installing a Windows language pack on Windows 8 before installing the .NET Framework 3.5 will cause the .NET Framework 3.5 installation to fail. Install the .NET Framework 3.5 before installing any Windows language packs.
Dont forget to share this troubleshooting tips with your friends.
Stay with Marks PC Solution to get more interesting IT topics!
Monday, April 11, 2016
Installing Google Chrome on Xubuntu
Firefox is the default web browser on Xubuntu. You can install an additional browser, such as Google Chrome. This document can help you download Chrome and then install it on your Xubuntu PC.
Note: The procedures in this document specifically apply to Xubuntu 12.04, and generally apply to all Xubuntu releases.
Downloading Chrome - To download Chrome for your Xubuntu PC, do the following:
- Click the Applications Menu (white mouse), select Internet, and then click Firefox Web Browser to display its Ubuntu Start Page.
- In the Google search field, type google chrome, and then press Enter to search for and display links to Google Chrome.
- Click Chrome Browser - Google, click Download Chrome, select 32 bit .deb (For Debian/Ubuntu), and then click Accept and Install.
- Select Save File, and then click OK to download Chrome.
- Close Firefox, and then install Chrome according to procedure below.


Installing Chrome - To install Chrome on your Xubuntu PC, do the following:
- Download Chrome according to the procedure above.
- Double-click your Home folder, click Download, right-click the google-chrome-stable-current file, and then click Open With Ubuntu Software Center.
- After the Ubuntu Software Center window displays google-chrome-stable, click Install, type your password, and then click Authenticate.
- Close the Ubuntu Software Center window, click Applications Menu (white mouse), select Internet, click Google Chrome, make it your default browser (optional), and then click Start Google Chrome. (If prompted to Choose password for new keyring, click Cancel).


Saturday, March 26, 2016
Installing Linux into a specific partition
Multibooting more than one Linux operating system (OS) can help you compare precisely how each works on your PC. While installing a Linux OS, you might wish to install it into a specific partition on your hard disk or solid-state drive (SSD). This document can help you create a new logical partition and then install a new Linux OS into it.
Authors note: In my experience, multibooting Linux operating systems works best with Ubuntu and Ubuntu-based operating systems.
Creating a new logical partition
You can add a new Linux OS to a PC on which you have already installed at least one other OS. For example, your multiboot configuration might include two partitions and an extended partition, as follows:
- Partitions /dev/sda1 and /dev/sda2 contain an MS Windows 7 OS.
- Extended partition /dev/sda3, contains three logical partitions for Linux. Allow at least 20 GB for each Linux OS.
- Logical partition /dev/sda5 contains your Ubuntu Linux OS.
- Logical partition /dev/sda6 contains the Linux swap file. Note: Regardless how many Linux operating systems you plan to install, you need only one swap partition (approximately 2 GB).
- Logical partition /dev/sda7 contains your Linux Mint OS.
You need to create a new logical partition before you can install a third Linux OS into the above example configuration. As shown in Figure 1, you can use the Gnome Partition Editor (GParted) to create a new logical partition, such as /dev/sda8.
 |
| Figure 1 - Creating a new logical partition, /dev/sda8. |
Installing Linux into a root partition
While installing Linux into a specific logical partition you must define that partition as root. To install a new Linux OS into your new logical partition, do the following:
- Download an ISO image file of the Linux OS that you wish to install, and then burn it to a DVD to create a live disc. Alternatively, you can use an ISO image to create a live usb drive.
- Boot the live disc and then begin installing your new Linux OS. When you see an Installation-type window similar to Figure 2, select Something else, which lets you install your new Linux OS into your new logical partition.
- Click Continue to display a window to similar to Figure 3, select (highlight) your new logical partition, and then double-click it to display an Edit-partition window as shown in Figure 4.
- In the Use-as dropdown menu, select Ext4 journaling file system.
- Checkmark the Format the partition box.
- In the Mount-point dropdown menu, select "/" to define your new logical partition as root.
- Click OK to close the Edit-partition window, and then click Install now. Note: Do not try to skip steps 4 through 7. Omitting them displays an error message, "No root file system is defined. Please select this from the partitions menu." For more information, see Ask Ubuntu.
- Install your new Linux OS and then reboot your PC to display a Grand Universal Boot (GRUB) menu similar to Figure 5. In this example, Zorin OS 6 is the new Linux OS. Note: If your GRUB menu does not display, you can restore it through an open-source Boot Repair CD.
 |
| Figure 2 - On the Installation Type menu, you select "Something else" if you wish to create a partition into which you can install your new Linux OS. |
 |
| Figure 3 - Selecting (highlighting) your new logical partition. |
 |
| Figure 4 - Double-clicking your new logical partition displays an Edit-partition window. |
 |
| Figure 5 - Your GRUB menu should include your new Linux OS, such as Zorin OS 6. |
Thursday, March 24, 2016
Installing Chromium on Ubuntu 12 10
Chromium is the open-source browser on which Google bases its Chrome browser. Therefore, these browsers are nearly identical, and you can use Chromium in place of Chrome. In fact, you should do so on Ubuntu 12.10. If you try to install Chrome on a PC running Ubuntu 12.10, the installation halts and displays "The package is of bad quality" as shown in Figure 1 below.
 |
Figure 1 - A warning against installing Google Chrome on Ubuntu 12.10. You should instead install Chromium. |
This document explains how to remove Google Chrome (if installed), install Chromium, and then configure it.
Removing Google Chrome
In case you have installed Google Chrome on Ubuntu 12.10, you should remove it and then install Chromium according to the next section. To remove (uninstall) Google Chrome, do the following:
In case you have installed Google Chrome on Ubuntu 12.10, you should remove it and then install Chromium according to the next section. To remove (uninstall) Google Chrome, do the following:
- Open a terminal, type sudo apt-get install synaptic, type your password and then wait for Synaptic to install.
- Type sudo synaptic to display the Synaptic Package Manager window.
- Type google-chrome into the Quick filter search field.
- Right-click google-chrome-stable, click Mark for Complete Removal, click Apply to display a Summary window and then click Apply.
- Close both the Synaptic Package Manager window and the terminal.
Installing Chromium
To install Chromium on Ubuntu 12.10, do the following:
To install Chromium on Ubuntu 12.10, do the following:
- As shown in Figure 2 below; in the Unity launcher, click the Ubuntu Software Center icon to display its window.
- As shown in Figure 3 below, type chromium into the search field, select Chromium Web Browser and then click Install.
- Type your password and then click Authenticate to start the installation.
- After Chromium installs, close the Ubuntu Software Center.
- Configure Chromium according to the next section.
 |
Figure 2 - Opening the Ubuntu Software Center. |
 |
Figure 3 - Installing the Chromium Web Browser. |
Configuring Chromium
To configure Chromium on Ubuntu 12.10, do the following:
To configure Chromium on Ubuntu 12.10, do the following:
- Click Dash Home (at top of the launcher) and then click Chromium Web Browser as shown in Figure 4 below.
- Minimize the Chromium window; in the Unity launcher, right-click the Chromium icon; and then click Lock to Launcher as shown in Figure 5 below.
- Maximize the Chromium window, click sign in (at the upper right) to display the Sign in to Chromium window as shown in Figure 6 below.
- Type your email address, and then click either Sign in or Create a Google Account. If you already have a Google account, Chromium can synchronize your bookmarks, history, and settings.
- Click the three bars at the upper right, and then click Settings to display its window.
- Select Open a specific page or set of pages, click Set pages, select https//www.google.com/ and then click OK.
- As shown in Figure 7 below, scroll to Default browser, click Make Chromium my default browser and then close the Settings - Chromium window.
 |
Figure 4 - Opening Chromium through Dash. |
 |
Figure 5 - Locking the Chromium icon to the Unity launcher. |
 |
Figure 6 - Signing into Chromium, and syncing to your Google account. |
 |
Figure 7 - Making Chromium your default browser. |
Thursday, March 10, 2016
Installing Chromium on Xubuntu 12 10
Chromium is the open-source browser on which Google bases its Chrome browser. Therefore, these browsers are nearly identical, and you can use Chromium in place of Chrome. In fact, you should do so on Xubuntu 12.10 (a community-developed Linux distribution based on Ubuntu core components and Xfce Linux desktop environment). If you try to install Chrome on a PC running Xubuntu 12.10, the installation halts and displays "The package is of bad quality" as shown in Figure 1 below.
 |
Figure 1 - A warning against installing Google Chrome on Xubuntu 12.10. You should instead install Chromium. |
This document explains how to remove Google Chrome (if installed), install Chromium, and then configure it.
Removing Google Chrome
In case you have installed Google Chrome on Xubuntu 12.10, you should remove it and then install Chromium according to the next section. To remove (uninstall) Google Chrome, do the following:
In case you have installed Google Chrome on Xubuntu 12.10, you should remove it and then install Chromium according to the next section. To remove (uninstall) Google Chrome, do the following:
- Open a terminal, type sudo apt-get install synaptic, type your password and then wait for Synaptic to install.
- Type sudo synaptic to display the Synaptic Package Manager window.
- Type google-chromeinto the Quick filter search field.
- Right-click google-chrome-stable, click Mark for Complete Removal, click Apply to display a Summary window, and then click Apply.
- Close both the Synaptic Package Manager window and the terminal.
Installing Chromium
To install Chromium on Xubuntu 12.10, do the following:
To install Chromium on Xubuntu 12.10, do the following:
- As shown in Figure 2 below, click the Applications Menu (white mouse, upper left on screen) and then click Ubuntu Software Center to display its window.
- As shown in Figure 3 below, type chromium into the search field, select Chromium Web Browser and then click Install.
- After Chromium installs, close the Ubuntu Software Center.
- Configure Chromium according to the next section.
 |
Figure 2 - Opening the Ubuntu Software Center. |
 |
Figure 3 - Installing the Chromium Web Browser. |
Configuring Chromium
To configure Chromium on Xubuntu 12.10, do the following:
- Click the Applications Menu (white mouse), click Internet and then click Chromium Web Browser as shown in Figure 4 below.
- Click sign in (at the upper right of your first Chromium window) to display the Sign in to Chromium window as shown in Figure 5 below.
- Type your email address, and then click either Sign in or Create a Google Account. If you already have a Google account, Chromium can synchronize your bookmarks, history, and settings.
- Click the three bars at the upper right, click Settings to display its window.
- Select Open a specific page or set of pages, click Set pages, select https//www.google.com/ and then click OK.
- As shown in Figure 6 below, scroll to Default browser, click Make Chromium my default browser and then close the Settings - Chromium window.
 |
Figure 4 - Selecting and opening Chromium. |
 |
Figure 5 - Signing into Chromium, and syncing to your Google account. |
 |
Figure 6 - Making Chromium your default browser. |
Subscribe to:
Posts (Atom)
