Showing posts with label 12. Show all posts
Showing posts with label 12. Show all posts
Friday, April 29, 2016
Repairing frozen Dash in Ubuntu 12 10
Ubuntu 12.10 is the newest Ubuntu distribution of the Linux operating system. After you install or upgrade to Ubuntu 12.10, its Dash search window might not work correctly. Intermittently, Dash can freeze (hang up) after you type only a few characters into its search field. This document can probably help you repair Dash by installing a proprietary video driver.
Authors Note: I experienced this problem on my medium-powered (AMD dual-core, 2 GB memory), rebuilt PC, into which I had installed a new motherboard. I use this machine as my standby and experimental PC, on which I ran Ubuntu 12.04 with no Dash problems.
To repair frozen dash by installing a proprietary video driver, do the following:
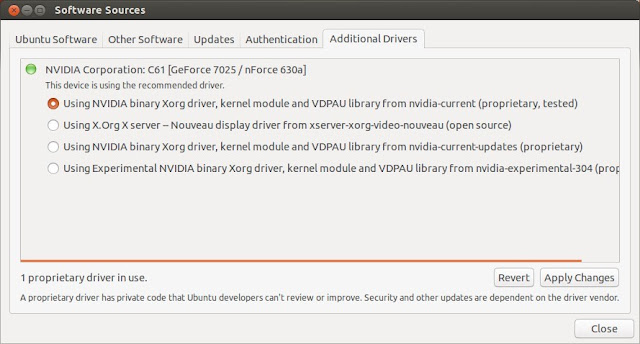
- In the launcher, click System Settings to display its window, click Software Sourcesto display its window, and then click the Additional Drivers tab to display its page.
- Select an appropriate driver, such as the NVIDIA binary Xorg - - (proprietary, tested) driver shown below, and then click Apply Changes.
- When prompted, type your password, and then click Authenticate.
- Close the Software Sources window.
- Reboot your PC.


How to restore Ubuntu 12 04 display resolution
Ubuntu 12.04 can lose its display resolution if it can no longer detect your display device. For example, the next time you boot your Ubuntu 12.04 PC, you might find that your display resolution has switched from 1280 x 960 to 800 x 600, which is nearly useless. Fortunately, this happens only rarely. In case you should be not so lucky, this document defines display resolution and explains how you might restore it in your Ubuntu 12.04 PC.
Note: Although this document applies specifically to Ubuntu 12.04, it also applies generally to other Ubuntu releases.
Defining display resolution
A 1280 x 960 (1280 columns by 960 rows of pixels) resolution displays 1,228,800 total pixels. In contrast, an 800 x 600 resolution displays only 480,000 total pixels, which reduces overall display resolution by 61%. For more information, please see Resolution, by Ted Hewitt at Riverside Community College.
A 1280 x 960 (1280 columns by 960 rows of pixels) resolution displays 1,228,800 total pixels. In contrast, an 800 x 600 resolution displays only 480,000 total pixels, which reduces overall display resolution by 61%. For more information, please see Resolution, by Ted Hewitt at Riverside Community College.
Restoring Ubuntu 12.04 display resolution
If you lose normal display resolution on your Ubuntu 12.04 PC, you might restore your resolution by re-enabling display detection as follows:
If you lose normal display resolution on your Ubuntu 12.04 PC, you might restore your resolution by re-enabling display detection as follows:
- Turn off your display, and then disconnect its AC power cord.
- After waiting longer than 15 seconds, reconnect the AC power cord to your display, and then turn it on.
- Reboot your Ubuntu 12.04 PC.
- As shown in Figure 1 below, in the launcher, click the System Settings icon to display its window.
- As shown in Figure 2 below, in the Hardware section, click the Displays icon to display its window.
- Click Detect Displays to detect your display.
- Select a resolution, such as 1280 x 960 (4:3), and then click Apply to change the resolution.
- If you like your selected resolution, click Keep This Configuration to display a window similar to Figure 3 below.
Note: For additional information about trouble-shooting Ubuntu display resolution, please see Why cant Ubuntu 12.04 detect my screen resolution?.
 |
Figure 1 - Clicking the System Settings icon in the launcher. |
 |
Figure 2 - Clicking the Displays icon in the System Settings window. |
 |
Figure 3 - This is the Displays window for an example restored resolution. |
Wednesday, April 13, 2016
Longer Rest Periods Compromise Adaptational Response in Resistance Training Older Men in 12 Week Study
 |
| Best-agers listen up: If you want to make progress, socialize after your workouts and stick to rest periods in the 60-90s range. |
I have to admit, with a mean age of 70.3 years, the 22 male volunteers of said study dont qualify as the "classic" gymrat. On the other hand, you will probably have heard the argument that aging muscle cannot sustain the same extent of high intensity hammering thats highly productive in younger folks against.
Learn more about building muscle at www.suppversity.com

Tri- or Multi-Set Training for Body Recomp.?
Alternating Squat & Blood Pressure - Productive?
Pre-Exhaustion Exhausts Your Growth Potential
Full ROM ? Full Gains - Form Counts!
Battle the Rope to Get Ripped & Strong
Study Indicates Cut the Volume Make the Gains!
Against that background, its actually all the more surprising that the 11 men in the 60s rest period groups of this recent 4 weeks resistance training study saw significantly greater increase in lean muscle mass, bench press & leg press 1RM max, performance on the pull-down and several parameters of functional performance (not shown in Figure 1).Tri- or Multi-Set Training for Body Recomp.?
Alternating Squat & Blood Pressure - Productive?
Pre-Exhaustion Exhausts Your Growth Potential
Full ROM ? Full Gains - Form Counts!
Battle the Rope to Get Ripped & Strong
Study Indicates Cut the Volume Make the Gains!
 |
| Figure 1: Changes in body composition and strength after 8 and 12 weeks; expressed relative to the values that were measured after the 4-week pre-training phase that was identical for both groups (Villanueva. 2014) |
- Training frequency: 3 days/week for the 4-week training cycle
- Sets / reps: 2 to 4 sets with 15 to 8 repetitions (set number increased, rep number decreased over time)
- Exercise number: Four to six exercises per workout
"this strength outcome measure, because previous work from our lab has indicated there is relatively less variability among study participants with chest press 1-RM val ues, versus leg press 1-RM values, and, therefore, it would allow us to more easily randomize and create two treatment groups that are similar in (upper body maximum) strength.In the following 8-week actual study period the subjects were subjected to a progressive total-body resistance training program emphasizing development of upper and lower body strength.
- Training frequency: 3 days/week for 8 weeks by both groups (SS and SL)
- Sets / reps: sets ranged from 2 to 3, repetitions from 6 to 4
- Exercise number: 4–6 exercises
"Throughout the entire resistance training program, all sets were performed maximally for the assigned number of repetitions and with proper lifting technique, and loads were adjusted in accordance with recovery and performance, across the repeated sets progression.
 |
| At least in untrained subjects shorter rest periods (60s vs. 150s) may have more beneficial effects on body composition, i.e. they elicit greater lean mass gains and higher losses of body fat (Buresh. 2009) |
Furthermore, it is important to note that study participants were never expected to perform sets to absolute muscular failure; given an appropriate loading progression, with alterations in set/repetition schemes throughout and across microcycles (i.e., a series of 3 training sessions), the repetition maximum assignments allowed for successful completion of the assigned number of repetitions at the load(s) prescribed, across multiple sets, and with minimal need for assistance/spotting" (Villanueva. 2014.)Now this certainly sounds as if the protocol was realistic. But there is one major difference that puts a question mark behind the results of the study: usually regimen with long and short rest times differ significantly in the number of sets and the number of reps. Thus it is possible that future studies using different protocols for both groups would yield different results.
 |
| Figure 2: More helps more... at least in elderly study subjects increasing the intake of whey protein after a workout from 20g to 40g will yield significant benefits (Yang. 2012). |
Another thing that is wirth mentioning is that the subjects consumed >1.0 gram protein/kilogram body weight/day - without the addition of fast absorbing high BCAA protein sources, however, elderly men (and women) are always having a hard time to build practically relevant amounts of lean muscle.
Against that background, I would love to see this study being repeated with 30-40g of whey protein being consumed in the vicinity of the workout; and in case you want to do your own N=1 experiment using this or any other workout protocol described in the study at hand, I would suggest you make sure to add some extra-protein, as well. Previous studies do after all indicate that "more" as in 40g vs. just 15-20g helps more in men and women in their 60s or older | Comment on Facebook!
- Buresh, Robert, Kris Berg, and Jeffrey French. "The effect of resistive exercise rest interval on hormonal response, strength, and hypertrophy with training." The Journal of Strength & Conditioning Research 23.1 (2009): 62-71.
- de Salles, Belmiro Freitas, et al. "Rest interval between sets in strength training." Sports Medicine 39.9 (2009): 765-777.
- Villanueva, Matthew G., Christianne Joy Lane, and E. Todd Schroeder. "Short rest interval lengths between sets optimally enhance body composition and performance with 8 weeks of strength resistance training in older men." European journal of applied physiology (2014): 1-14.
- Willardson, Jeffrey M., and Lee N. Burkett. "The effect of different rest intervals between sets on volume components and strength gains." The Journal of Strength & Conditioning Research 22.1 (2008): 146-152.
- Yang, Yifan, et al. "Resistance exercise enhances myofibrillar protein synthesis with graded intakes of whey protein in older men." British Journal of Nutrition 108.10 (2012): 1780-1788.
Thursday, March 24, 2016
Installing Chromium on Ubuntu 12 10
Chromium is the open-source browser on which Google bases its Chrome browser. Therefore, these browsers are nearly identical, and you can use Chromium in place of Chrome. In fact, you should do so on Ubuntu 12.10. If you try to install Chrome on a PC running Ubuntu 12.10, the installation halts and displays "The package is of bad quality" as shown in Figure 1 below.
 |
Figure 1 - A warning against installing Google Chrome on Ubuntu 12.10. You should instead install Chromium. |
This document explains how to remove Google Chrome (if installed), install Chromium, and then configure it.
Removing Google Chrome
In case you have installed Google Chrome on Ubuntu 12.10, you should remove it and then install Chromium according to the next section. To remove (uninstall) Google Chrome, do the following:
In case you have installed Google Chrome on Ubuntu 12.10, you should remove it and then install Chromium according to the next section. To remove (uninstall) Google Chrome, do the following:
- Open a terminal, type sudo apt-get install synaptic, type your password and then wait for Synaptic to install.
- Type sudo synaptic to display the Synaptic Package Manager window.
- Type google-chrome into the Quick filter search field.
- Right-click google-chrome-stable, click Mark for Complete Removal, click Apply to display a Summary window and then click Apply.
- Close both the Synaptic Package Manager window and the terminal.
Installing Chromium
To install Chromium on Ubuntu 12.10, do the following:
To install Chromium on Ubuntu 12.10, do the following:
- As shown in Figure 2 below; in the Unity launcher, click the Ubuntu Software Center icon to display its window.
- As shown in Figure 3 below, type chromium into the search field, select Chromium Web Browser and then click Install.
- Type your password and then click Authenticate to start the installation.
- After Chromium installs, close the Ubuntu Software Center.
- Configure Chromium according to the next section.
 |
Figure 2 - Opening the Ubuntu Software Center. |
 |
Figure 3 - Installing the Chromium Web Browser. |
Configuring Chromium
To configure Chromium on Ubuntu 12.10, do the following:
To configure Chromium on Ubuntu 12.10, do the following:
- Click Dash Home (at top of the launcher) and then click Chromium Web Browser as shown in Figure 4 below.
- Minimize the Chromium window; in the Unity launcher, right-click the Chromium icon; and then click Lock to Launcher as shown in Figure 5 below.
- Maximize the Chromium window, click sign in (at the upper right) to display the Sign in to Chromium window as shown in Figure 6 below.
- Type your email address, and then click either Sign in or Create a Google Account. If you already have a Google account, Chromium can synchronize your bookmarks, history, and settings.
- Click the three bars at the upper right, and then click Settings to display its window.
- Select Open a specific page or set of pages, click Set pages, select https//www.google.com/ and then click OK.
- As shown in Figure 7 below, scroll to Default browser, click Make Chromium my default browser and then close the Settings - Chromium window.
 |
Figure 4 - Opening Chromium through Dash. |
 |
Figure 5 - Locking the Chromium icon to the Unity launcher. |
 |
Figure 6 - Signing into Chromium, and syncing to your Google account. |
 |
Figure 7 - Making Chromium your default browser. |
Wednesday, March 23, 2016
Alternative disc burning software for Ubuntu 12 04
In the Ubuntu 12.04 distribution of the LInux operating system, Brasero Disc Burner is the default disc-burning software, which lets you write to (burn) any blank, writable disc (CD or DVD) that you place into your optical drive. If you have any problem with Brasero, you can install alternative disc-burning software, Xfburn.
To install Xfburn into Ubuntu 12.04 on your PC, do the following:
Read more »
To install Xfburn into Ubuntu 12.04 on your PC, do the following:
- In the Launcher, click on the Ubuntu Software Center icon.
- Type xfburn in the search field.
- Click Xfburn, and then click Install.
Note: Do not remove (uninstall) Brasero because you might need either Xfburn or Brasero or according to various circumstances. Either burner might work when the other cannot. For example, while making my first video, How to create a Redo live CD, I needed to burn several CDs while learning to make a correct screencast. To my frustration, after I burned one CD, Brasero would not let me burn another until I rebooted my PC. I later verified that I did not need to reboot my PC while burning multiple discs through Xfburner.
Sunday, March 13, 2016
Advice Upgrade from Ubuntu 12 04 ONLY after backup
If you are planning to upgrade from Ubuntu 12.04 to 12.10, please first perform a full-system backup. At least back up all your data. The upgrade might not work.
Today, 11-27-2012, after attempting to update my main PC from Ubuntu 12.04 to 12.10, I could not make Ubuntu 12.10 work correctly. Despite using the recommended "proprietary, tested" Nvidia display driver, I could not stabilize my display:
This failure to upgrade surprised me because I had successfully installed Ubuntu 12.10 (through a live disc) onto my standby PC. I needed only fix the frozen-Dash problem and disable the unwanted Amazon ads. For more information, please see: Fixing and customizing Ubuntu 12.10, Repairing frozen Dash in Ubuntu 12.10, and Disabling Amazon shopping results in Ubuntu 12.10.
Personally, I do not plan to upgrade from Ubuntu 12.04 until the next long-term-support release is available. Although this is unfortunate, I am still an Ubuntu fan. In my opinion, its 12.04 release is superior to all other Linux distributions.
Read more »
Today, 11-27-2012, after attempting to update my main PC from Ubuntu 12.04 to 12.10, I could not make Ubuntu 12.10 work correctly. Despite using the recommended "proprietary, tested" Nvidia display driver, I could not stabilize my display:
- The Unity launcher would not unhide smoothly.
- YouTube videos played in stop motion.
This failure to upgrade surprised me because I had successfully installed Ubuntu 12.10 (through a live disc) onto my standby PC. I needed only fix the frozen-Dash problem and disable the unwanted Amazon ads. For more information, please see: Fixing and customizing Ubuntu 12.10, Repairing frozen Dash in Ubuntu 12.10, and Disabling Amazon shopping results in Ubuntu 12.10.
Personally, I do not plan to upgrade from Ubuntu 12.04 until the next long-term-support release is available. Although this is unfortunate, I am still an Ubuntu fan. In my opinion, its 12.04 release is superior to all other Linux distributions.
Thursday, March 10, 2016
Installing Chromium on Xubuntu 12 10
Chromium is the open-source browser on which Google bases its Chrome browser. Therefore, these browsers are nearly identical, and you can use Chromium in place of Chrome. In fact, you should do so on Xubuntu 12.10 (a community-developed Linux distribution based on Ubuntu core components and Xfce Linux desktop environment). If you try to install Chrome on a PC running Xubuntu 12.10, the installation halts and displays "The package is of bad quality" as shown in Figure 1 below.
 |
Figure 1 - A warning against installing Google Chrome on Xubuntu 12.10. You should instead install Chromium. |
This document explains how to remove Google Chrome (if installed), install Chromium, and then configure it.
Removing Google Chrome
In case you have installed Google Chrome on Xubuntu 12.10, you should remove it and then install Chromium according to the next section. To remove (uninstall) Google Chrome, do the following:
In case you have installed Google Chrome on Xubuntu 12.10, you should remove it and then install Chromium according to the next section. To remove (uninstall) Google Chrome, do the following:
- Open a terminal, type sudo apt-get install synaptic, type your password and then wait for Synaptic to install.
- Type sudo synaptic to display the Synaptic Package Manager window.
- Type google-chromeinto the Quick filter search field.
- Right-click google-chrome-stable, click Mark for Complete Removal, click Apply to display a Summary window, and then click Apply.
- Close both the Synaptic Package Manager window and the terminal.
Installing Chromium
To install Chromium on Xubuntu 12.10, do the following:
To install Chromium on Xubuntu 12.10, do the following:
- As shown in Figure 2 below, click the Applications Menu (white mouse, upper left on screen) and then click Ubuntu Software Center to display its window.
- As shown in Figure 3 below, type chromium into the search field, select Chromium Web Browser and then click Install.
- After Chromium installs, close the Ubuntu Software Center.
- Configure Chromium according to the next section.
 |
Figure 2 - Opening the Ubuntu Software Center. |
 |
Figure 3 - Installing the Chromium Web Browser. |
Configuring Chromium
To configure Chromium on Xubuntu 12.10, do the following:
- Click the Applications Menu (white mouse), click Internet and then click Chromium Web Browser as shown in Figure 4 below.
- Click sign in (at the upper right of your first Chromium window) to display the Sign in to Chromium window as shown in Figure 5 below.
- Type your email address, and then click either Sign in or Create a Google Account. If you already have a Google account, Chromium can synchronize your bookmarks, history, and settings.
- Click the three bars at the upper right, click Settings to display its window.
- Select Open a specific page or set of pages, click Set pages, select https//www.google.com/ and then click OK.
- As shown in Figure 6 below, scroll to Default browser, click Make Chromium my default browser and then close the Settings - Chromium window.
 |
Figure 4 - Selecting and opening Chromium. |
 |
Figure 5 - Signing into Chromium, and syncing to your Google account. |
 |
Figure 6 - Making Chromium your default browser. |
Sunday, January 3, 2016
How to set up Ubuntu 12 04
On April 26, 2012, Canonical released its newest distribution of the free, open-source Linux operating system, Ubuntu 12.04. After you either download and install it, or upgrade to it, these simple procedures can help you enjoy an efficient Ubuntu PC.

Note: Although these basic settings specifically apply to Ubuntu 12.04, they also generally apply to other Ubuntu releases.
Setting up Ubuntu 2D graphics - Ubuntu 3D graphics provide visual effects, but slow the information display on your PC. Therefore, if you do not have a new, ultra-fast PC, setting up Ubuntu 2D graphics should display information much faster. To set up Ubuntu 2D graphics, do the following:
- Boot or reboot your Ubuntu 12.04 PC.
- At the login dialog, click the "gear" icon.

- Click Ubuntu 2D, type your password and then press Enter.

Setting up your mouse - Setting up your mouse first makes other system settings easier to adjust. To set up your mouse, do the following:
- Click the System Settings icon (in the Launcher at the left).

- Click the Mouse and Touchpad icon.

- As you prefer, adjust Pointer Speed, Drag and Drop, and Double-Click Timeout. Note: A low Pointer Speed Sensitivity facilitates adjusting window sizes.

- Click All Settings (at the top) to redisplay the System Settings window.
Setting up your screen timeout - To set up your screen timeout, do the following:
- Click the System Settings icon.
- Click the Brightness and Lock icon.
- As you prefer, adjust the screen-timeout and Lock settings. Note: For a home PC, you usually need no Lock.

Setting up your system sound - To set up your system sound, do the following:
- Click the System Settings icon.
- Click the Sound icon.
- As you prefer, adjust your system sound input and output settings. Note: Make sure all Mute selectors are unchecked.

- Click the System Settings icon .
- Click the Additional Drivers icon
- Select any "Recommended" driver.

- Click Activate, type your password, and then click Authenticate.
- To activate the driver, close all windows and restart your PC.
- Set up the driver. For example, if your PC has NVIDIA graphics, click the Ubuntu logo (at the top of the launcher) to open Dash, select the applications icon (second at the bottom), type nv (nvidia) in the search field, click NVIDIA X Server Settings, adjust settings such as Color Correction: Brightness, Contrast and Gamma.


Subscribe to:
Posts (Atom)
