Showing posts with label xubuntu. Show all posts
Showing posts with label xubuntu. Show all posts
Thursday, April 28, 2016
Installing Xubuntu
Based on Ubuntu, Xubuntu is a lean distribution of the LInux operating system that:
Notes:

Installing Xubuntu on your PC - To install Xubuntu through its bootable disc, do the following:


Read more »
- Lets you access your applications through traditional menus, providing an alternative to other operating systems that access applications differently.
- Runs well on older or slower PCs. Why discard a PC simply because it is too slow for MS Windows?
Notes:
- The procedures for installing Xubuntu are similar to those for Ubuntu.
- For more information, please see Getting started with Xubuntu.
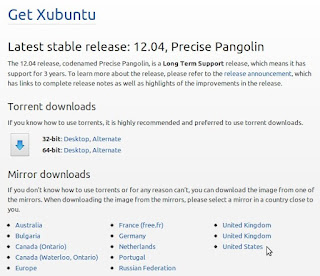
Creating an Xubuntu bootable disc - You create an Xubuntu bootable disc (live CD or DVD) by downloading and then burning an ISO file. To create an Xubuntu bootable disc, do the following:
- Go to the Xubuntu website, click Get Xubuntu, and then click a download mirror according to your region, such as the United States. Alternatively, you can use a torrent download.
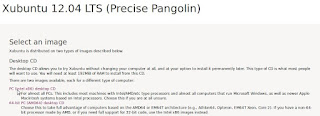
- Click on PC (Intel X86) desktop CD to download its ISO image. Alternatively, you can select 64-bit PC (AMD64) desktop CD.
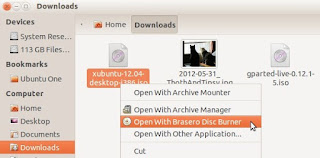
- In your Downloads folder, right-click the image file, such as xubuntu-12.04-desktop-i386.iso, and then select a disc burner, such as Brasero.
- Place a blank, writable CD or DVD into your optical drive, and burn your Xubuntu bootable disc.
- Place your Xubuntu bootable disc into the optical drive on your PC, and then reboot it.
- Click Install Xubuntu to start the installation process. Note: You can first try Xubuntu by running it from its live CD. This does not disturb your current operating system.
- Select an installation type, and then click Continue.
- When your are ready to install Xubuntu, click Install Now.
- Select your time zone, and then click Continue.
- Either accept the default keyboard layout, English (US), or select another according to your requirements, and then click Continue.
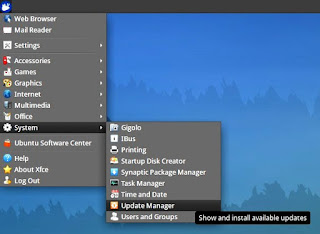
- Type your user name, create a password, and then click Continue.At the upper-left desktop corner, click the Applications Menu (mouse) icon, select System, click Update Manager, and then install all updates.
Wednesday, April 20, 2016
Setting up Xubuntu
Xubuntu is a community-developed Linux distribution based on Ubuntu core components and the Xfce Linux desktop environment. As I show in Getting started with Xubuntu, it works very well immediately after you install it. However, you can set up (customize, configure) Xubuntu according to your needs or preferences.

After studying and/or trying example set-up procedures for Xubuntu, you can more easily perform its other setup procedures. This document contains the following example procedures:
- Displaying the Settings window
- Customizing the date and time display
- Customizing windows
- Setting up the mouse
Notes:
- The example procedures in this document specifically apply to Xubuntu 12.04, and generally apply to all Xubuntu releases.
- My example settings show only how I have set up my Xubuntu PC. Of course, despite my sophisticated taste, you must set up your PC according to your preferences. :-)
Displaying the Settings window -The Settings window contains icons through which you can set up almost all Xubuntu features. To display your Settings window, do the following:
- Move your mouse pointer to the bottom of the screen to display its bottom panel, which contains several application icons.
- Place your mouse pointer over the Settings Manager icon to display its name and description.
- Click the Settings Manager icon to display the Settings window.


- Display the Settings window according to the procedure above, click Panel to display its window, and then select Panel 1 (if not already selected). Note: Panel 1 is at the top of the screen, Panel 2 at the bottom.
- In the Measurements section, use the Size (pixels) slider to change the panel size to 35 pixels. Note: Increasing the height of Panel 1 makes your date and time easier to read.
- Close the Panel window.
- Right-click the current date and time to display the Datetime properties menu.
- Click Properties to display its window.
- In the Layout section, set Format to Date, then time.
- In the Date section, click the current font, set its style to Bold, set the Format to mm/dd/yy, and then click OK.
- In the Time section, set the font style to Bold, set the Format to 23:59:59, and then click OK.


- Display the Settings window according to the procedure in the Displaying the Settings window section above.
- Click Window Manager to display its window.
- In the Theme section, scroll to and select Wallis.
- In the Title font section, increase the font size to 11 pt.
- In the Button layout section, click and drag buttons to place Close, Maximize, and Hide buttons on the left; and the Menu button on the right.
- Close the Window Manager window.


- Display the Settings window according to the procedure in the Displaying the Settings window section above.
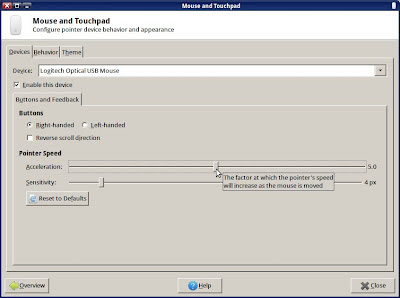
- Click Mouse and Touchpad to display its window.
- Make adjustments according to your preferences. For example, in the Pointer Speed section, you can increase Acceleration to 5.0.
- Close the Mouse and Touchpad window.
Monday, April 11, 2016
Installing Google Chrome on Xubuntu
Firefox is the default web browser on Xubuntu. You can install an additional browser, such as Google Chrome. This document can help you download Chrome and then install it on your Xubuntu PC.
Note: The procedures in this document specifically apply to Xubuntu 12.04, and generally apply to all Xubuntu releases.
Downloading Chrome - To download Chrome for your Xubuntu PC, do the following:
- Click the Applications Menu (white mouse), select Internet, and then click Firefox Web Browser to display its Ubuntu Start Page.
- In the Google search field, type google chrome, and then press Enter to search for and display links to Google Chrome.
- Click Chrome Browser - Google, click Download Chrome, select 32 bit .deb (For Debian/Ubuntu), and then click Accept and Install.
- Select Save File, and then click OK to download Chrome.
- Close Firefox, and then install Chrome according to procedure below.


Installing Chrome - To install Chrome on your Xubuntu PC, do the following:
- Download Chrome according to the procedure above.
- Double-click your Home folder, click Download, right-click the google-chrome-stable-current file, and then click Open With Ubuntu Software Center.
- After the Ubuntu Software Center window displays google-chrome-stable, click Install, type your password, and then click Authenticate.
- Close the Ubuntu Software Center window, click Applications Menu (white mouse), select Internet, click Google Chrome, make it your default browser (optional), and then click Start Google Chrome. (If prompted to Choose password for new keyring, click Cancel).


Thursday, March 10, 2016
Installing Chromium on Xubuntu 12 10
Chromium is the open-source browser on which Google bases its Chrome browser. Therefore, these browsers are nearly identical, and you can use Chromium in place of Chrome. In fact, you should do so on Xubuntu 12.10 (a community-developed Linux distribution based on Ubuntu core components and Xfce Linux desktop environment). If you try to install Chrome on a PC running Xubuntu 12.10, the installation halts and displays "The package is of bad quality" as shown in Figure 1 below.
 |
Figure 1 - A warning against installing Google Chrome on Xubuntu 12.10. You should instead install Chromium. |
This document explains how to remove Google Chrome (if installed), install Chromium, and then configure it.
Removing Google Chrome
In case you have installed Google Chrome on Xubuntu 12.10, you should remove it and then install Chromium according to the next section. To remove (uninstall) Google Chrome, do the following:
In case you have installed Google Chrome on Xubuntu 12.10, you should remove it and then install Chromium according to the next section. To remove (uninstall) Google Chrome, do the following:
- Open a terminal, type sudo apt-get install synaptic, type your password and then wait for Synaptic to install.
- Type sudo synaptic to display the Synaptic Package Manager window.
- Type google-chromeinto the Quick filter search field.
- Right-click google-chrome-stable, click Mark for Complete Removal, click Apply to display a Summary window, and then click Apply.
- Close both the Synaptic Package Manager window and the terminal.
Installing Chromium
To install Chromium on Xubuntu 12.10, do the following:
To install Chromium on Xubuntu 12.10, do the following:
- As shown in Figure 2 below, click the Applications Menu (white mouse, upper left on screen) and then click Ubuntu Software Center to display its window.
- As shown in Figure 3 below, type chromium into the search field, select Chromium Web Browser and then click Install.
- After Chromium installs, close the Ubuntu Software Center.
- Configure Chromium according to the next section.
 |
Figure 2 - Opening the Ubuntu Software Center. |
 |
Figure 3 - Installing the Chromium Web Browser. |
Configuring Chromium
To configure Chromium on Xubuntu 12.10, do the following:
- Click the Applications Menu (white mouse), click Internet and then click Chromium Web Browser as shown in Figure 4 below.
- Click sign in (at the upper right of your first Chromium window) to display the Sign in to Chromium window as shown in Figure 5 below.
- Type your email address, and then click either Sign in or Create a Google Account. If you already have a Google account, Chromium can synchronize your bookmarks, history, and settings.
- Click the three bars at the upper right, click Settings to display its window.
- Select Open a specific page or set of pages, click Set pages, select https//www.google.com/ and then click OK.
- As shown in Figure 6 below, scroll to Default browser, click Make Chromium my default browser and then close the Settings - Chromium window.
 |
Figure 4 - Selecting and opening Chromium. |
 |
Figure 5 - Signing into Chromium, and syncing to your Google account. |
 |
Figure 6 - Making Chromium your default browser. |
Wednesday, February 17, 2016
Changing the default word processor in Xubuntu
Writer is the word-processing application in the LibreOffice productivity suite. AbiWord is the default word processor in Xubuntu. This document explains how to set LibreOffice Writer as the default word processor on your Xubuntu PC. You need to install LibreOffice, and then uninstall AbiWord.
Installing LibreOffice
To install LibreOffice on your Xubuntu PC, do the following:
1 - Click Applications Menu (white mouse, upper left), and then click Ubuntu Software Center to open it.
2 - Type libreoffice into the search field to display icons for all available LibreOffice items, including its entire office-productivity suite.
3 - Select the LibreOffice (productivity suite) icon, and then click Install.
4 - Type your password, click Authenticateand then wait for the installation to finish.
5 - Close the Ubuntu Software Center window.
Note: For more information, see:
* - Installing LibreOffice on Xubuntu
* - Disabling word-processor automatic corrections
Uninstalling AbiWord
Normally, as shown in Figure 1, you can set Writer as default by right-clicking any odt (open document text) file, clicking Properties and then selecting LibreOffice Writer in the Open With field. However, this is not currently working in Xubuntu 12.10; you cannot directly reset any application as default. Therefore, to set LibreOffice Writer as your default word processor, you need to uninstall AbiWord.
 |
| Figure 1 - Currently, directly setting the default does not work. |
Note:After you uninstall Abiword, you can use LibreOffice Writer to edit any document you have created through Abiword.
To uninstall AbiWord, do the following:
1 - Click Applications Menu (white mouse), and then click Ubuntu Software Center to open it.
2 - Type abiword into the search field to display the AbiWord icon as shown in Figure 2.
 |
| Figure 2 - Removing (uninstalling) AbiWord. |
3 - Select AbiWord, click Remove, and then click Remove All.
4 - Type your password, click Authenticateand then wait for the removal to finish.
5 - Close the Ubuntu Software Center window.
Sunday, January 10, 2016
Installing LibreOffice on Xubuntu
Although Xubuntudoes not include the LibreOffice productivity suite by default, you can install it easily through the Ubuntu Software Center. After you have installed Xubuntu on any PC, this document can help you install LibreOffice and then configure it according to your preferences.
Intalling LibreOffice - To install LibreOffice on your Xubuntu PC, do the following:
- Click the Applications Menu icon (white mouse at the top-left of your screen) to display the Applications Menu.
- Click Ubuntu Software Center, type libreoffice into the search field, scroll down to, and click, LibreOffice, and then click Install.
- Type your password, click Authenticate, and then wait for the installation to finish. A progress indicator displays immediately above the Install button.
- Close the Ubuntu Software Center window.
- Click the Applications Menu icon, and then click Office to display its menu, which now includes icons for the LibreOffice suite, and its individual applications: Base, Calc, Draw, Impress and Writer.


Configuring LibreOffice - After you have installed LibreOffice, you can configure it according to your preferences. The following links can help you get started with LIbreOffice:
- LibreOffice (procedures and examples)
- How to set up Open Office (or LibreOffice) Writer for easy use
- Using Language Tool to check grammar in LibreOffice
- Disabling word-processor automatic corrections
Subscribe to:
Posts (Atom)
