Showing posts with label using. Show all posts
Showing posts with label using. Show all posts
Sunday, April 24, 2016
Using Ubuntus heads up display HUD
The Ubuntu 12.04Unity interface includes a heads-up display (HUD) that gives you an alternative to navigating through menu paths. If you remember a command (or part of it) that is the path target, you can use HUD to search for that command and execute it directly.


Read more »
Using HUD to execute commands - You can use HUD to search for and execute commands, which you can also access through traditional menus. To use HUD, do the following:
- Press Alt to display HUD as the "Type your command" search field.

- Start typing the command you want (or part of it) until HUD displays it as an item in a menu path.
- To execute a command, such as for opening a window, click on the command. Alternatively, you can scroll to it and press Enter.
Note: Executing a command closes HUD automatically. To close HUD before you execute a command, press Alt.
Example system commands - System actions you can perform through Ubuntu HUD commands include:
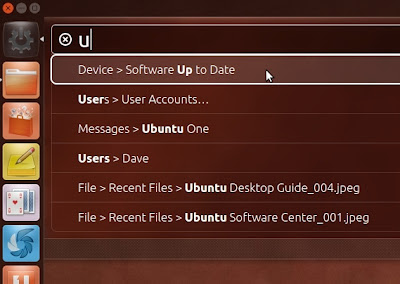
- Launching the Update Manager by typing u and then clicking Device > Software Up to Date.
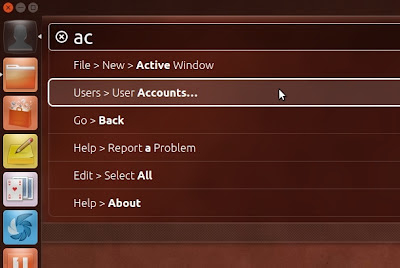
- Displaying the User Accounts window by typing ac and then clicking Users > User Accounts.
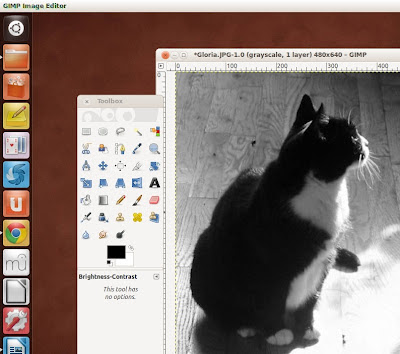
Example GIMP commands - The GNU Image Manipulation Program (GIMP) is an application that lets you perform actions through its associated HUD commands.
Note: HUD works only with applications that use the Unity global menu bar, such as GIMP, Chrome, and Image Viewer.
GIMP actions you can perform through HUD commands include:
- Displaying the Scale Image window by typing sc and then clicking Image > Scale Image.


- Displaying the Brightness-Contrast window by typing br and then clicking Colors > Brightness-Contrast.


- Converting an image from RGB (full color) to monochrome (black and white) by typing gra and then clicking Image > Mode > Grayscale.

Sunday, March 20, 2016
How to Create a Clock Using Notepad

It has been a long time since Ive posted about notepad tricks last time. Today Im gonna share another funny notepad trick. This time you will learn how to create a Clock with date and time in notepad. You can also edit the code by yourself. But incorrectly altering the code may result failure. So try it carefully . . .
There are many other notepad tricks published in this site. You can read these here:
- Twin Tower Attack Trick by Notepad!
- Make a Diary Using Notepad!
- Make Calculator Using Notepad !!
- Convert Text into Audio by Notepad!!
- Convert Drives to NTFS without Formatting!
Okay lets start. All you need to do is just copy the following code and paste this in a notepad document. Then save it as batch file I mean saving with .bat extension. Follow the steps below:
- Go to the Desktop. (You can do it anywhere. But desktop will be more convenient.)
- Click right mouse button and select Text Document to open Notepad. (Or Press Start + R > type Notepad > hit Enter)
- Now copy the following code and paste it in the newly created text document.
- Save the file as Clock.bat (Save it on Desktop or anywhere you like).
- Now you will see a batch file named Clock.bat
- Double click on it to see the result!
@echo offTitle DOS Based Date and Clockcolor bcls: Clockclsecho Current Date: %date%echo .............echo .............echo Current Time: %time%goto Clock
Customize the Code: You can also customize the code as below-
- You can change the Title of the code. Look at the title- Dos Based Date and Clock. You can use any name instead of the blue part.
- You can also change the color. Here Ive used b for Aqua. You can use- 0 for black, 1 for blue, 2 for green, thus you can test 3, 4, 5, 6, 7, 8, 9, a, c, d, e, f. Each one will give you a different color!
Stay with Marks PC Solution to get more interesting IT topics!
Friday, March 11, 2016
Guidelines for Using PC Properly

Look at the image above. Most of the regular users of desktop have this hand mark. Specially at the right hand and it is caused by your mouse. Even I have a mark too. Do you have this?
Couple of years ago people were not too much interested to use computer. In that time the use of computer was actually confined to the software developers, web developers, gamers etc. But when the social sites specially Facebook gained popularity across the world the trend gets changed. Now the general people spend much more time on PC than developers!!
Today Im gonna talk about some ways (Tips n Tricks) to use your PC properly. The discussion will be divided into two parts. The first part is about your health. And the second part is about your PC health. Okay lets start.
Remember: If youre a blogger or something like web developer or programmer then this tips is not for you. This applies to normal people.

Part 1: For your Health
- Never use your PC for more than 3/4 hours a day.
- Make sure youve sufficient lighting and air facility in the place where you use PC.
- Keep the place free of dust.
- The chair and table youre using should be comfortable enough. Use only computer table. (Look at the image for proper positioning)
- Never look at the screen continuously for a long time. Take break at least after every 5 minutes to avoid eye strain. Look at the wall or window of the room.
- Sitting in front of PC for a long time is not a good idea. You can go for a little walk after every 30/40 minutes. Then you can back.
- Never use PC in a dark room. Keep the light on while using PC. If you use PC in a dark room it will create a huge pressure on your eyes. The result will be the loss of vision!
- Keep the brightness of your monitor to a minimum level. High brightness may create eye strain.
- Try to limit the use of social sites. Because surveys show these are not good for mental health.
Part 2: For PC Health
- Turn your PC on and turn it off properly.
- Never use too many programs at a time that your PC cant afford.
- Use a reliable antivirus or security software that can protect your operating system from virus.
- Close the unnecessary programs after using.
- Never install too much programs on your PC. If you have unnecessary programs installed on your PC, just remove them.
- Perform maintenance activities on a regular basis (Defragment, Disk Check, Clean Up etc.)
- Open your casing at least two times a year. Clean it up properly and carefully. Check the internal and external connections. Unplug and plug them again if necessary.
- Keep the place free. A small place is not good for a PC. Make sure the place is cool enough. Heat is always bad for a PC.
- Never keep your PC turned on for a long time if the room is not air conditioned. Otherwise it will be over heated and thus it will affect the lifetime.
- The cable used in the PC should be high quality. The main switch should also be perfect. Otherwise it may create short circuit.
I will try to update this post later. Keep in touch . . .
Maintenance Tasks: Extend Your PC Life
Stay with Marks PC Solution to get more interesting IT topics!
Tuesday, February 23, 2016
Using Shutter to take screenshots in Linux
The procedures in this document can help use the Shutterscreenshot tool for Linux. You can capture your entire desktop, an active window, or any rectangular area you select. Shutter lets you save your screenshots directly as JPEG image files. In contrast, pressing PrtScn (Print Screen) to capture a desktop, or Alt+PrtScn to capture an active window, lets you save your screenshot only as a PNG file. If you want a JPEG, you must separately convert it from a PNG.
You can install Shutter through the software-application catalog in your Linux operating operating system. For example, for Ubuntu, you can use the Ubuntu Software Center.
Configuring Shutter
Configuring Shutter
To configure Shutter, do the following:
- Open Shutter to display its window as shown in Figure 1.
- Click the down arrow at the right of Selection, and then select Advanced selection tool. This lets you resize your selection rectangle before you take a screenshot.
- In the Shutter toolbar at the top of the desktop, click Edit, and then click Preferences to display its window as shown in Figure 2.
- Set Image-format to jpeg, Directory to Desktop, select (check mark) Include cursor when taking a screenshot and then set the capture delay to 15 seconds.
 |
| Figure 1 - Shutter lets you take a screenshot as a Selection, Desktop, or Window. In Ubuntu 11.04, the Shutter toolbar is above your desktop, at the left. |
 |
| Figure 2 - My recommended Preferences are setting Image-format to "jpeg," Directory to "Desktop," selecting (check marking) "Include cursor when taking a screenshot" and setting the capture delay to "15" seconds. |
Capturing your desktop
To take a screenshot of your desktop through Shutter, do the following:
- Start Shutter, click the down arrow at the right of Desktop, and then click Capture all Workspaces to take the screenshot and place an icon for its new JPEG on your desktop.
- In the Shutter window, close the image tab by clicking on its X, and then minimize the Shutter window.
- Double-click the new icon to display an image similar to Figure 3.
 |
| Figure 3 - A desktop screenshot. |
Capturing an active window
To take a screenshot of an active window through Shutter, do the following:
- Select a window to activate it. For example, I activated the Calculator window as shown in Figure 3.
- Start Shutter, click the down arrow at the right of Window, and then click "Active Window" to take the screenshot and place an icon for its new JPEG on your desktop.
- In the Shutter window, close the image tab by clicking on its "X," and then minimize the Shutter window.
- Double-click the new icon to display an image similar to the fourth image above.
 |
| Figure 4 - An active-window screenshot. |
Capturing a rectangular area
To take a screenshot of a rectangular area through Shutter, do the following:
- On your desktop, group whatever items you plan to include in your captured rectangular area.
- Start Shutter, click Selection, use your mouse to draw a rectangular area, and then press Enter to take the screenshot and place an icon for its new JPEG on your desktop.
- In the Shutter window, close the image tab by clicking on its X, and then minimize the Shutter window.
- Double-click the new icon to display an image similar to Figure 5.
 |
| Figure 5 - A selected-rectangular-area screenshot. |
Friday, February 5, 2016
Create Sample Barcode using Photoshop !!

In this post, Im gonna publish a funny tutorial of Adobe Photoshop. Now I will show you how to create a sample barcode (fake) by Photoshop. It will not be a real one but look like an original barcode. And maybe all of you know that original barcodes are machine readable. A real barcode includes product information like country of origin, manufacture and expiry date etc.
Im using Adobe Photoshop CS5 for this tutorial. But so far I know, any version of Adobe Photoshop will produce the same result for you. Okay lets start -
- Run Adobe Photoshop and open a new file with following settings
- Choose Width 250 px, Height 100 px, Resolution 72, RGB Color Mode with 32 bit, White Background and hit OK.
- Now you will get a white rectangle in the screen.
- Go to the Filter Menu > Noise > Add Noise . . . > Amount 400 > Distribution - Gaussian > Select Monochromatic > Hit OK.
- You white rectangle will take the following look.

- Again go to the Filter Menu > Blur > Motion Blur . . . > Angle - 90 degree > Distance - 999 pixels > Hit OK.

- Look, Ive just cut the bottom part of the image with Rentangular Marquee Tool. Choose Rectangular Marquee Tool from the toolbar. Now click and drag as my image shows above leaving a small portion from left and right part. Hit on the delete button and choose white color.
- Press T or simply open the Type Tool > Choose Arial font with 10/12 pt size > Type some digits randomly as below.

Were almost done. But you cant save it! Because at the very beginning, you chose 32 bit color mode. But if you want to save the image as JPG or PNG, you must select 8 bit color. Then why I suggested to use 32 bit? Because 32 bit will give you a better look which 8 bit or 16 bit cant.
If you choose 8 bit or 16 bit color, there will be no problem. You can directly save it as JPG or PNG. But the quality will fall somewhat.
Then How to Save?
- Look at the layer panel. Possible there are two layers - Text and Background. Press Shift key > select both the layers > Click right mouse button > hit on Convert to Smart Object.
- Now press Ctrl + A > Ctrl + C > Ctrl + N > In the Color Mode - Choose RGB and 8 bit > Hit OK.
- Press Ctrl + S > Select either JPG or PNG > Hit OK.
I prefer PNG due to its brilliant quality.
Note: If you avoid using 32 bit color mode while opening the new document you will not face any problem while saving it. Simply use 8 bit when you create the document at the beginning. Then you can easily save it just after completing the barcode. But in that case, the bars will not be so clear.
Do you like this tutorial? :)
Stay with Marks PC Solution to get more interesting IT topics!
Friday, January 8, 2016
Using LanguageTool to check grammar in LibreOffice
LibreOffice is a powerful, free, open-source office-productivity suite that you can run under a Linux, Mac OS X or Microsoft Windows operating system. LibreOffice has a built-in spelling checker. You can install a grammar checker by adding a LanguageTool extension.
Though the procedures below specifically apply to the Ubuntu distribution of the Linux operating system, they also generally apply to the OS X and Windows operating systems.
Adding the LanguageTool extension - To add the LanguageTool extension to your Ubuntu Linux operating system, do the following:
- Go to the LibreOffice Extensions website, and then scroll to LanguageTool.
- Click LanguageTool to open its window.
- Scroll to the Current Release, such as LanguageTool 1.7, and then click Get Language Tool for all platforms to download it to your specified download folder.
- Open a new LibreOffice Writer document, click Tools and then click Extension Manager to display its window.
- Click Add to display the Add Extensions page.
- Select LanguageTool-stable.oxt, and then click Open to add LanguageTool to your LibreOffice extensions.
- Click Close to close the Extension Manager window and redisplay your LibreOffice Writer document.
Configuring LanguageTool - To configure LanguageTool, do the following:
- Add the LanguageTool extension according to the procedure above.
- In a LibreOffice Writer document, click Tools, click LanguageTool and then click Configuration to display the LanguageTool Options window.
- Select a language, such as English, and then click OK.
- Click Tools, click Options, click the arrow at the left of Language Settings, click Writing Aids, select Check grammar as you type and then click OK.
- Verify that LibreOffice indicates grammar errors through blue, wavy underlines, and spelling errors through red, wavy underlines.
Subscribe to:
Posts (Atom)
