Showing posts with label tutorial. Show all posts
Showing posts with label tutorial. Show all posts
Saturday, April 30, 2016
HTML Tutorial 5 Basic Elements on An HTML Form Part 1
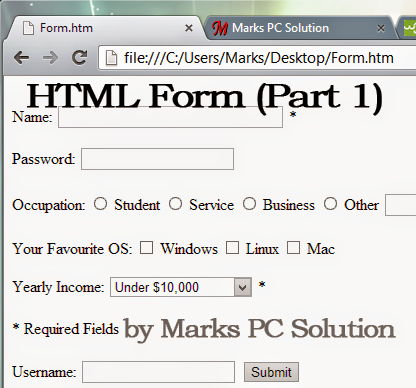
Few months ago, I started writing about HTML. There are already 4 tutorials published on HTML. I know this is not sufficient for an HTML learner. Because learning HTML requires much resources and practice. However I will try to write about HTML whenever Im able to manage time.
You can also read the previously published HTML Tutorial:
- Tutorial 1
- Tutorial 2
- Tutorial 3
- Tutorial 4
Todays HTML tutorial is very easy, funny and useful. Today I will discuss about the basic elements of an HTML form. This is the part 1 that includes Text Fields, Password Field, Radio Buttons & Checkboxes.
How to Start:
You can practice using notepad. Press Start + R > Type Notepad > Enter. Now copy or type the code from here. And save them as form.htm or use any other name. But the name should end with either .htm or .html. Then open the file in a browser.
Lets begin -
Usually an HTML form contains input elements like text fields, checkboxes, radio buttons, submit buttons etc. To create an HTML form you must use the <form> tag. Look at the structure below:
<form>
input elements
</form>
Though you skip the <form> tag, modern browsers can identify your form. But this is a basic rule for creating html forms. So you should start with <form> and end with </form>.
Text Fields:
<input type="text"> indicates a one-line input field to enter text.
<form>First name: <input type=text><br>Last name: <input type=text></form>
The result will be as below:
Note: <br> tag is used to create line break. Otherwise both fields will appear in a single line. The default width of a text field is 20 character. You can increase it as below:
The result will be:
<form>Name: <input type=text size = 40><form>
The result will be:
Radio Buttons:
<input type="radio"> refers to a radio button. Radio button allows user to choose a single item. After selecting an item, you can change it. But once selected, you cant undone it.
<form>Which one do you like most?<input type=radio name=Mobile>Nokia<br><input type=radio name=Mobile>Samsung<br><input type=radio name=Mobile>Apple</form>
You will get:
Checkboxes:
<input type="checkbox"> defines a checkbox. Somewhat similar to radio buttons. But here an user can choose multiple items. And he can deselect the item any time!
<form>What is your Favorite Browser?<input type=checkbox>Google Chrome<br><input type=checkbox>Firefox<br><input type=checkbox>Internet Explorer<br><input type=checkbox>Opera<br><input type=checkbox>Other<br></form>
Your browser will show:
These are some important elements of an HTML form. There are few other elements remaining. I will try to write about those elements in the next post. And then Ill put these all together and show you how to prepare an HTML form. Till then, stay with us . . .
Stay with Marks PC Solution to get more interesting IT topics!


Monday, March 14, 2016
HTML Tutorial 2 Basic Parts of HTML Document

In my previous post, I started writing about HTML. As it was the first tutorial of HTML, I just showed you the example of an HTML document without giving detailed information of that document.
In this post, Im gonna discuss about the essential parts of an HTML document. Essential parts mean those parts which are very common for each and every HTML document. I mean the HTML tag, the Header, the Title and the Body.
Before you start, please have a look at the HTML Tutorial 1 if you havent go through this already.
After reading the tutorial 1 look at the image below:

Here you can see all the four parts that I used in the example document. Lets what are they actually:
The HTML Tag: <html>
Every HTML or XHTML document start with <html> tag and ends with </html> tag. Even if you right click on this page and hit on view source/ view page source option you will see the html of this post. At the top you will see <html> tag, and and the bottom you will see </html>.
That means the whole document is considered as HTML by the browser. So, whenever you create a new HTML document, you must start it with <html> tag and end with </html> tag.
The Document Head: <head> Tag
This tag is placed just below the <html> tag. This is the head of your document. It may include many other tags. Most importantly, the header tag includes the document title, I mean the <title> tag.
The Document Title: <title> Tag
Your document should have a Title. Title should be started with <title> tag and it will be ended by </title> tag. Basically title is the name of your document. It will not appear in the document text! You will be able to see the title just at the browser tab. See the example image of Tutorial 1.
The Document Body: <body> Tag
This is your actual contents. What do you wanna write or create in an HTML document should be within <body> </body> tag. It may include thousands of other tags which are necessary to decorate your document.
By this time, hopefully you have a basic idea about an HTML document and its essential parts. You should notice every tag starts with <> and ends with </>. Actually some tags dont have any closing tag! And some tags dont need to be closed.
Which tags dont need to be closed and which dont have any ending tag at all will be discussed later. And in my next post, I will discuss the different tags used in the Tutorial 1.
HTML is not very tough learn. But the area of HTML is huge. Latest version of HTML is HTML 5. HTML may include new rules in the future just like as new words and phrases are added to a language. So you will never be able to finish your HTML course. It is a life long learning.
All you need is patience to be skilled in HTML. Learn the rules one by one and step by step. Use them in your works and practice the rules. You should be fine with HTML.
HTML is not very tough learn. But the area of HTML is huge. Latest version of HTML is HTML 5. HTML may include new rules in the future just like as new words and phrases are added to a language. So you will never be able to finish your HTML course. It is a life long learning.
All you need is patience to be skilled in HTML. Learn the rules one by one and step by step. Use them in your works and practice the rules. You should be fine with HTML.
Stay with Marks PC Solution to get more interesting IT topics!
Tuesday, March 1, 2016
Complete Tutorial on Facebook Open Graph

Facebook Open Graph allows you to use custom site title, URL, description and even a custom image when you share your page. If you use Facebook Open Graph code on your site, every time when you share any page, it will be counted directly for your home page. Suppose, if I share the following URL on Facebook -
http://www.markspcsolution.com/2014/09/complete-tutorial-on-facebook-open-graph.html
The sharing/ like will be counted for -
http://www.markspcsolution.com/
But If there is no open graph code on my site, the sharing of the first URL will be counted individually. And the sharing will not be counted for your home page. Now I guess, youve understood the importance of open graph. Its really helpful to increase facebook likes of your site rapidly.
Couple of days ago, I discussed about how to claim a site on Facebook. Following the same method, you can place Facebook Open Graph code on your site. Open graph code is as follows:
You have to place the above code in the head (<head> </head>) section of your sites HTML. The code must be placed before closing head tag - </head>.

Now follow the steps below:

Couple of days ago, I discussed about how to claim a site on Facebook. Following the same method, you can place Facebook Open Graph code on your site. Open graph code is as follows:
<meta property="og:title" content="Site Title">
<meta property="og:description" content="Site Description">
<meta property="og:type" content="Content Type">
<meta property="og:url" content="http://www.example.com/">
<meta property="og:image" content="Custom Image Link">
<meta property="og:site_name" content="Your Site Name">
<meta property="fb:admins" content="Your Numeric FB ID">
You have to place the above code in the head (<head> </head>) section of your sites HTML. The code must be placed before closing head tag - </head>.
Now follow the steps below:
- Go to Facebook Insights > Domain Insights > Add your Domain
- Type your home page URL > Copy the Numeric FB ID > Keep the window open
- Go to your sites code or HTML and find the closing header tag </head>
- Place the above code before closing header tag
- Now back to the Facebook Insight Page
- Hit on the Get Insights button
- Now you should be able to see your domain under the Domain Insights section
There are 7 meta properties in the above code. You have to change in the content option. Make sure youve used them properly. Im gonna clarify the points -
- Site Title Example - Marks PC Solution.
- Site Description - Whats your site about. Example - Your Ultimate Choice for Computer, Internet, Blogging, SEO & PC Troubleshooting Tips!
- Content Type - Website/ Blog/ Article/ News etc.
- Site URL Example - www.markspcsolution.com
- Custom Image - Upload your desired image in a server. Then simply copy and paste the link here. You can use postimage.org to upload image.
- Type your Site Title here. Example - Marks PC Solution.
- Numeric FB ID that youve got from the 2nd step in Facebook Insights Page. You can also find numeric by this method.
Troubleshooting
If you face any problem after implementing the code on your site, you can take help of Debugger. Here you can paste your site URL and debug the errors. You can check whether all properties are functioning normally or if there is a problem.
Remember, you can omit some properties. If you use Custom Image, then it will be same for any link of your site. So you can also use a shorter version of the code as below:
<meta content=Website property=og:type/><meta content=http://www.example.com/ property=og:url/><meta content=100002127563096 property=fb:admins/>
It will do the same job for you. You can also use multiple Admin IDs. Simply add more numeric IDs in the admin property.
If you need any support regarding Facebook Open Graph, please leave a comment . . .
Stay with Marks PC Solution to get more interesting IT topics!
Thursday, February 11, 2016
HTML Tutorial 3 Most Common Tags Used in HTML Documents

Im sorry for the delay to publish new posts but something was wrong with my PC. Thats why I was in trouble with this and not able to write something new. Well Id like to continue the HTML tutorial.
In this post I will discuss about some tags which are very common in preparing HTML documents. But before you go, dont forget to look at the following posts if you havent already gone through:
- Creating a Simple HTML Document
- Basic Parts of an HTML Document
Lets talk about the most common tags of HTML documents. You should also have a close look at our example document. Some of these tags are also used in that document. I think this will be helpful for you.

- Structural Tags: <html>, <head>, and <body> are the main structural tags of any HTML document. Each and every HTML document must contain these tags. Title tag - <title> is also very important for an html document. Besides there are tags which are very common for all HTML documents. These are discussed below:
- Anchors <a href> </a>: This tag is used to create anchor text. For example: <a href=http://munnamark.blogspot.com>Marks PC Solution</a>. The browser will show only Marks PC Solution hiding the link of our site. When someone clicks on the text, he will be directed to Marks PC Solution home page
- Paragraph <p>: This tag is used to create a new para. It has no end tag! You just need to place a <p> tag when you want to create a new para.
- Line Break <br>: This tag is used to break the current line. It is similar to pressing Enter button in Word Processors like MS Word or Wordpad. This tag has no end tag too! You can break a like just by typing <br> before that line.
- Bold <b> </b>: This tag is used to bold the text. For example: <b>Bold</b>. The result will be Bold.
- Italic <i> </i>: This tag is used to italicize the text. For example: <i>Italic</i>. The result will be Italic.
- Underline <u> </u>: This tag is used to underline a text. For example: <u>Underline</u>. The result will be Underline.
- Heading Tags: Start Tags: <h1>, <h2>, <h3>, <h4>, <h5>, <h6>. End Tags: </h1>, </h2>, </h3>, </h4>, </h5>, </h6>. These tags are used to define the titles of the document. For example, <h1> is used for the document header title. <h1>Marks PC Solution</h1>. <h2> is used for the document section title. <h2>Your Ultimate Choice for Computer, Internet, Blogging, SEO & PC Troubleshooting Tips</h2>. Thus <h3>, <h4>, <h5> and <h6> decreases the font size of the title.
Dont be confused by someone or by yourself! There are many other common tags for HTML documents. But these are just for giving you an idea.
You should be careful while using the tags and their related attributes. Because any error in using the tags may result wrong output. Even a minor mistake may create serious problem. Because you may not be quick enough to find the errors!
By the way, the rules and stadard of HTML varies from time to time. Sometimes your browser is able to show the document correctly even if there is any error in the source file! But it doesnt mean that you will not try to keep the document accurate. Whatever you do, do it with care. Best of luck.
Stay with Marks PC Solution to get more interesting IT topics!
Tuesday, January 26, 2016
HTML Tutorial 7 Creating HTML List

Hello Guys! This is my tutorial number 7 on HTML. If you would like to read the previous 6 tutorials then please use the search box above, type HTML and get the HTML tutorials list.
Today I will discuss about a simple topic of HTML. Really this is as simple as I say! :) Okay lets start.
Practice Rules
Practice rules are as usual. Use notepad and a web browser. Save the file with .htm or .html extension.
HTML List: Ordered and Unordered
There are mainly two types of lists can be created by HTML code. The first one is ordered list and the other is unordered list.
Ordered List:
In an ordered list, the list items are marked by numbers. This exactly looks like a numbered list created by Microsoft Word or other text editing programs.
An ordered list starts with <ol> tag and ends with </ol> tag. Each item of the list starts with <li> tag and ends with </li> tag. Look at the code below:
<ol><li>Apple</li><li>Google</li><li>Microsoft</li></ol>
Remember, o indicates unordered (o) and l indicates list. Thus it is written as <ol>.
After enter this code, you will get the following output in your browser:
After enter this code, you will get the following output in your browser:
- Apple
- Microsoft
Unordered List:
In an unordered list, the list items are marked with bullets. Normally small black circles (·)
Code for unordered list is very similar. Instead of typing <ol>, you need to use <ul>. u for unordered and l for list. Follow the code below:
Your browser will display:
In an unordered list, the list items are marked with bullets. Normally small black circles (·)
Code for unordered list is very similar. Instead of typing <ol>, you need to use <ul>. u for unordered and l for list. Follow the code below:
<ul><li>Apple</li><li>Google</li><li>Microsoft</li></ul>
- Apple
- Microsoft
Description List:
There is another list in HTML which is known as description list. A description list contains a brief description of the list item.
But I think you can describe the list item simply typing some texts. This is not very important to create a different type of list to describe list items. Thats why Im not showing the code of description list.
Tip: You can use line breaks, text, links or images inside a list item.
Tags used in HTML List:
By this time youre familiar with the tags used in creating HTML list. Lets check them at once:
There is another list in HTML which is known as description list. A description list contains a brief description of the list item.
But I think you can describe the list item simply typing some texts. This is not very important to create a different type of list to describe list items. Thats why Im not showing the code of description list.
Tip: You can use line breaks, text, links or images inside a list item.
Tags used in HTML List:
By this time youre familiar with the tags used in creating HTML list. Lets check them at once:
- <ol> - Defines an ordered list
- <ul> - Defines an unordered list
- <li> - Defines a list item
- <dl> - Defines a description list
- <dt> - Defines a term/ name in description list
- <dd> - Defines a description of a term/ name in description list.
Stay with Marks PC Solution to get more interesting IT topics!
Monday, January 25, 2016
HTML Tutorial 6 Basic Elements of An HTML Form Part 2

In my previous post, I discussed about HTML form (Part 1). Same topic will be continued today and this is the Part 2. In part 1 youve learned creating Text Fields, Password Field, Radio Buttons and Checkboxes. In this post you will learn how to create Submit Button and Drop Down Menu.
You should open Notepad from your PC to practice this lesson. Then save the html code with .htm or .html extension and then open the saved file with a browser to see the result. Lets begin:
Drop Down Menu:
Let me begin with creating a drop down menu. This is very interesting as well as easy to create!
Which one is your Favorite Cell Phone Brand?<select><option>Nokia<option>Samsung<option>iPhone<option>BlackBerry<option>Others</select>
You must begin with the <select> tag and end with </select tag>. And every option of the list should start with <option> tag. Then you can type anything as you want. If you type the above text, your browser will show:
Which one is your Favorite Cell Phone Brand?
Submit Button:
Submit button is used to send data to the server. After filling up the form, an user need to confirm the email and submit it.
<input type=submit> denotes a submit button.
A simple submit button is very easy to create. You just need to write the following code:
<form>
<input type=submit>
</form>
Thats it. Now your browser will show:
It can be used as:
<form>
Username<input type=text>
<input type=submit>
</form>
Now if someone hits the submit button, the data will be sent to the server specified in the action attribute (Here: www.munnamark.blogspot.com).
Putting these elements altogether, hopefully you will be able to create a simple HTML form.
Putting these elements altogether, hopefully you will be able to create a simple HTML form.
Stay with Marks PC Solution to get more interesting IT topics!
Sunday, January 24, 2016
HTML Tutorial 4 Tags Without Ends

After a long break I am gonna write another tutorial on HTML. This will be the number 4 tutorial of HTML. Today I would like to share some tags which dont have any endings! I mean you can just start these tags but they have no corresponding end tags.
You might be interested to read the previously published HTML tutorial. These are as below:
- HTML Tutorial 1: Simple HTML Document (Example)
- HTML Tutorial 2: Basic Parts of an HTML Document
- HTML Tutorial 3: Most Common Tags in HTML Documents
Now I can proceed to the Tutorial 4: HTML Tags with No Ends. Have a look at the image below.

The above image doesnt include all the tags that have no ends. See the complete list below:
- <area>
- <base>
- <basefont>
- <br>
- <col>
- <frame>
- <hr>
- <img>
- <input>
- <isindex>
- <link>
- <meta>
- <param>
These tags have no corresponding ends. You just need to start them.
For example: The <br> tag is used to create a line break. I mean it is used to create a new line. And when you create another line break the first one automatically ends. So it is needless to put an end tag to the <br> tag. Thats why HTML standard excludes the corresponding end of the <br> tag.
The same thing happened to the other tags mentioned in the list above. Another example could be the <img> tag. It is used to link to the image. Is it necessary to end an image with the help of an ending tag? Not at all. Thats why the image tag is also dont have any ending tag.
* XHTML always requires end tags. (Quite disappointing!)
The <p> Tag:
What about the <p> tag? By this time you all know about this tag. It is used to create a paragraph. And it has a corresponding end tag too. You can also guess - </p>. But many HTML authors even dont know this exists!
However if you avoid the ending tag, I mean the </p> tag, your browser will never complain. The document will work quite fine. It is somewhat like the <br> tag. But the <br> tag has no end by rules.
You can consider the rule as Omitting Tags. Yes, there are some tags in HTML which have end tags but you can avoid them.
Hope you enjoy todays tutorial. Because this is an interesting feature of HTML in that sense that some tags have no ends. Some end tags you can omit as you wish. Stay in touch to get more . . .
Stay with Marks PC Solution to get more interesting IT topics!
Saturday, January 16, 2016
Full Tutorial on Blogger Comment Optimization

In my very last post, I talked about word verification in blogger blog. Reducing spam comment was also discussed there. Today youre getting a full tutorial on optimizing comment option in blogger. What you should do and shouldnt do in Comments setting will be discussed today. Enjoy . . .
The aim of this tutorial is:
- To make your blogs commenting process easier
- To keep your blog free of spam
- To make your visitors engaged with your site
Make sure youre signed in to your blogger account. Go to the Settings option from design or dashboard. Click on Post and Comments. Go to the Comments area. Now do the following:
- Comment Location: By default the location is embedded. You shouldnt change this to Full page, Pop up or Hide. Visitors like embedded comment box. This will appear just below your post.
- Who can Comment?: There are four options: Anyone, Registered User, User with Google Accounts, Only members of this blog. Choose the second option. I mean Registered User. Default setting is Anyone. But it allows anonymous users to comment on your site. To be honest, anonymous comment has no value. Anyone can comment by hiding his/ her ID. Even you can comment on your site anonymously. And it is not possible to track who is the person actually.
- Comment Moderation: You can choose either Never or Sometimes. But choosing moderation always may not be good. In that case someone may comment again and again and thought something is wrong with your site as his/her comment doesnt appear. I suggest you to choose Never. If you find any spam comment then you can manually delete them. Besides blogger has an automatic spam filter. So, dont worry.
- Show Word Verification: Default setting is Yes. But I recommend you to use No. If youre interested to know more about Word Verification then read this.
- Show Backlinks: This is not very important. You can choose either Hide or Show. If you choose Show then a link will be shown under the comment box- Create a Link to this Post. Then if someone click on this link he or she will get a link of the current post.
- Comment Form Message: This is up to you. Not very important. If you wanna give any message for the commentator you can write it here. It will be shown just below the comment box. For example you can write any advice or rules regarding comment. You can say HTML link is allowed. Or you can say spam comment is strictly prohibited etc.
Also have a look at the image below. Just try to make your comment option as the box shows:

Few Suggestions for you:
- Most of the cases commentator would like to create backlinks on your site. Allow them. Keep it mind that they comment on your site costing their valuable time.
- When the comment is too much irrelevant or only for the purpose of creating links then never remove it immediately. The first thing you can do is to request the commentator to make the comment relevant. If he/she doesnt change then you can remove his/ her comment.
- Always check your spam box. You will find it under the Comment just below the Pages option in the left pane. If any normal comment is detected as spam then choose not spam for this comment.
- Sometimes you might notice few spam comments are not detected by spam checker. In that case you can mark these comments as spam.
One final thing you should know- Showing strictness with the commentators is a very bad thing. If you misbehave with the commentators you will lose engaged users. Always value the visitors and their comments. Because they are actually your customers.
Suppose a visitor comes your site only for creating links. Never show hostile behavior with him. There are many sites for creating links. But he picks your site. Its your credit. So why do you show hostility. What is the guarantee that he will not be a loyal user of your site in the future?
Stay with Marks PC Solution to get more interesting IT topics!
Subscribe to:
Posts (Atom)
